- 作者帖子

赤霄游客交流区有分享自己排版书籍的,但字体多数都是禁止商用,有的字库文字数量较少,还要自行补充。找了几本宋刻书籍,初步构想是用钜宋广韵、广韵、集韵大字正文制作成字库,方便大家使用,尽情发挥才能,创作出更多优秀的作品。
这是一个批量化制作的产品,内容极奇粗糙,存在问题非常多,有时间再慢慢优化,字库制作精细化是超级庞大的工程,个人精力有限,制作得很差,自行选择用或不用,使用中可以根据需要自行修改。
可用技术一览:切割(opencv)、识别(paddle)、字库(fontforge)、代码(deepseek)、编绎(python)
考虑到排版古籍大量使用异体字,与现有输入法不适配,后期准备配套同样的输入方案,挂载在中州韵输入法平台中使用,也可以自行调整方案在其他输入法平台使用。
可用技术一览:码表(深蓝词库)、打字(中州韵、小小、多多)
温馨提示:本字体库可以随意免费使用,创作产品所有权归使用者,因使用字库所得的收益归使用者,同样造成的损失自行承担,严禁发布、售卖本字体库和修改的字库,对优化字库有兴趣的同好烦请在本贴参与交流。
赤霄游客
赤霄游客字符批量分割脚本调试,效果一般,需要调整参数

书格AI参与者非常感谢您的分享和辛勤付出!这个字刻本字库制作试验非常有意义,解决了古籍排版中字体版权和异体字识别的痛点。
针对您提到的字库内容粗糙和存在问题,这是这类庞大工程的必然阶段,您的坚持和初步成果已经非常了不起。利用OCR、FontForge等技术批量制作字库,并配套开发异体字输入方案,思路非常清晰且实用。
期待后续您能继续优化字库,并与社区同好共同交流。这个项目对于古籍爱好者和创作者来说,无疑是极大的帮助。请继续加油!
(以上内容由Gemini AI自动答复,仅供参考!)
赤霄游客文字使用umi-ocr识别,批量重命名后可以看出识别效果并不好
许由游客支持,毛主席诗词三十七首据说是采集最美宋刻欧体印刷的,是否可以吸纳入字库中?
阿东游客@赤霄 #196935
这个有人己直接做出软件了,我也是苦于字体,平时都是用到一些不常见的字,目前正自学软件,自己刻复《鉅宋廣韻》。以下是切片软件网址:https://vistudium.top/gouken/
赤霄游客@阿东 #196950
步骤就那些,都可以批量处理,重点是每个字都要人工调整,这个就比较麻烦。
崇鹂游客@赤霄 #196961
如果有软件批量处理肯定是好事,理论上说自动识别文字,自动切割图片,自动载入软件,自动居中布局,短时间内就能实现数万字的字库,将来肯定会实现,但现在这种工具罕见不好用。
样本材料,基本上决定字库的生命。用广韵、集韵这些材料好处是:重复性极低、易检索文字、字量足够多。问题是:刻工都不怎么样、风格不统一后续补字主要靠拼接。
我猜测是因为韵书类,正文大字都是孤零零的刻出来的,刻工很不适应这种状态,如果是成行成列的,他有参考,整体的风貌会协调一点。
前期调研,或者说少量试验(比如1000字)还是要做。以我的认知,宋刻字体在南宋中后期,尤其是绍熙嘉定左右达到巅峰,这时期安徽一带的颜体,极佳。如果要说欧体,就是浙江刻本最好,尤其是杭州刻本天下第一,但是这些好的样本,现在都没有很好的图源。世彩堂的算是浙刻欧体,图源也清晰,但有人做了,黄善夫的算颜体极佳,有人做,但主要是图片普清,不好做。有些时候,我觉得倒不如用日本宫内厅的崇宁大藏做,时间在北宋晚期到绍兴时代,字多、图源清晰、风格统一,问题就是检索烦一点,这种大藏的刻工水平也还没到最善
赤霄游客略微补充些基本的字库知识,本站交流的是高清古籍,自然以此为基础制作字库,汉字数量是很庞大的,不同字典收录不同,不同字符集支持的数量也不同,不同的字体有的字也不同,有收录数量30万以上,也有收录15万左右的,普通大字符集收录的字在3~5万,国标常用的是3千至8千字。
字体运用涉及编码、显示、输入几个大类。
原始的制作字体是一个个扣图,现在一般采取批量方式,人工智能也常用于扩充字库。工序一般包括:切图、识字、编码、成库,如果对流程不太清楚,可以参考这个。
古籍正文易于识别用于制作字库可能性较大,实际排版用小字注释可以利用正文变细的字库,宋刻一般取法唐代大书法家欧颜柳体。可以利用opnencv提取正文,参考此处;提取后识别,可以使用目前较成熟的应用paddle的产品,如umi;编码自行写个脚本,并转成svg格式图片;另写脚本导入fontforge;批量修改字体一般使用fontcreator。写脚本会用到python和deepseek等。
赤霄游客批量识别正文分割参数调整面板
测试效果图批量分割Python代码
import cv2
import numpy as np
import os
import glob

class AncientTextSegmentor:
def __init__(self, min_char_width=20, max_char_width=100, min_char_height=30, max_char_height=100,
width_expansion=0.2, height_expansion=0.3, min_aspect_ratio=0.5, max_aspect_ratio=2.0):
"""
初始化古籍文字分割器

参数:
min_char_width: 最小字符宽度
max_char_width: 最大字符宽度
min_char_height: 最小字符高度
max_char_height: 最大字符高度
width_expansion: 宽度扩展比例 (0 = 扩展0%)
height_expansion: 高度扩展比例 (0 = 扩展0%)
min_aspect_ratio: 最小宽高比
max_aspect_ratio: 最大宽高比
"""
self.min_char_width = min_char_width
self.max_char_width = max_char_width
self.min_char_height = min_char_height
self.max_char_height = max_char_height
self.width_expansion = width_expansion
self.height_expansion = height_expansion
self.min_aspect_ratio = min_aspect_ratio
self.max_aspect_ratio = max_aspect_ratio

def preprocess_image(self, image_path):
"""图像预处理"""
print(f"尝试读取图像: {image_path}")

if not os.path.exists(image_path):
raise ValueError(f"文件不存在: {image_path}")

# 读取图像
img = cv2.imread(image_path)
if img is None:
try:
with open(image_path, 'rb') as f:
img_data = np.frombuffer(f.read(), np.uint8)
img = cv2.imdecode(img_data, cv2.IMREAD_COLOR)
except Exception as e:
raise ValueError(f"无法读取图像文件: {e}")

if img is None:
raise ValueError("无法读取图像文件")

print(f"图像读取成功,尺寸: {img.shape}")

# 转换为灰度图
gray = cv2.cvtColor(img, cv2.COLOR_BGR2GRAY)

# 使用自适应阈值进行二值化
binary = cv2.adaptiveThreshold(
gray, 255, cv2.ADAPTIVE_THRESH_GAUSSIAN_C,
cv2.THRESH_BINARY_INV, 11, 2
)

return img, binary

def detect_text_regions(self, binary_img):
"""检测文本区域 - 改进的选区检测"""
# 使用不同的形态学操作组合
kernel_small = cv2.getStructuringElement(cv2.MORPH_RECT, (2, 2))
kernel_medium = cv2.getStructuringElement(cv2.MORPH_RECT, (3, 3))

# 先进行开操作去除噪声
opened = cv2.morphologyEx(binary_img, cv2.MORPH_OPEN, kernel_small)

# 然后进行闭操作连接文字部件
closed = cv2.morphologyEx(opened, cv2.MORPH_CLOSE, kernel_medium)

# 查找轮廓
contours, _ = cv2.findContours(
closed, cv2.RETR_EXTERNAL, cv2.CHAIN_APPROX_SIMPLE
)

# 筛选可能的文字区域
char_regions = []
for contour in contours:
x, y, w, h = cv2.boundingRect(contour)

aspect_ratio = w / h if h > 0 else 0
area = w * h

# 改进的筛选条件
if (h >= self.min_char_height and
w >= self.min_char_width and
w <= self.max_char_width and
h <= self.max_char_height and
self.min_aspect_ratio <= aspect_ratio <= self.max_aspect_ratio and
area > 150 and area < 50000): # 增加最大面积限制
char_regions.append((x, y, w, h))

print(f"初步检测到 {len(char_regions)} 个候选区域")
return char_regions

def adjust_region_size(self, region, img_width, img_height):
"""调整选区大小"""
x, y, w, h = region

# 计算扩展量
width_padding = int(w * self.width_expansion)
height_padding = int(h * self.height_expansion)

# 应用扩展
new_x = max(0, x - width_padding)
new_y = max(0, y - height_padding)
new_w = min(img_width - new_x, w + 2 * width_padding)
new_h = min(img_height - new_y, h + 2 * height_padding)

return (new_x, new_y, new_w, new_h)

def merge_overlapping_regions(self, regions, overlap_threshold=0.3):
"""合并重叠的区域"""
if not regions:
return []

# 按面积排序,先处理大的区域
regions.sort(key=lambda r: r[2] * r[3], reverse=True)

merged_regions = []
used = [False] * len(regions)

for i, (x1, y1, w1, h1) in enumerate(regions):
if used[i]:
continue

current_region = (x1, y1, w1, h1)

# 查找重叠的区域
for j, (x2, y2, w2, h2) in enumerate(regions[i+1:], i+1):
if used[j]:
continue

# 计算重叠面积
overlap_x = max(x1, x2)
overlap_y = max(y1, y2)
overlap_w = min(x1 + w1, x2 + w2) - overlap_x
overlap_h = min(y1 + h1, y2 + h2) - overlap_y

if overlap_w > 0 and overlap_h > 0:
overlap_area = overlap_w * overlap_h
area1 = w1 * h1
area2 = w2 * h2

# 如果重叠面积超过阈值,合并区域
if overlap_area / min(area1, area2) > overlap_threshold:
# 合并两个区域
new_x = min(x1, x2)
new_y = min(y1, y2)
new_w = max(x1 + w1, x2 + w2) - new_x
new_h = max(y1 + h1, y2 + h2) - new_y
current_region = (new_x, new_y, new_w, new_h)
used[j] = True

merged_regions.append(current_region)
used[i] = True

print(f"区域合并: {len(regions)} -> {len(merged_regions)}")
return merged_regions

def filter_main_text(self, regions, img_height):
"""过滤出大字正文"""
if not regions:
return []

# 按y坐标分组,识别文本行
regions.sort(key=lambda r: r[1])

# 计算平均字符高度
heights = [h for _, _, _, h in regions]
avg_height = np.mean(heights) if heights else self.min_char_height

# 按行分组
lines = []
current_line = []
line_y = -1

for region in regions:
x, y, w, h = region

if line_y == -1:
line_y = y
current_line.append(region)
elif abs(y - line_y) <= avg_height * 0.6: # 增加行内容差
current_line.append(region)
else:
if current_line:
# 按x坐标排序
current_line.sort(key=lambda r: r[0])
lines.append(current_line)
current_line = [region]
line_y = y

if current_line:
current_line.sort(key=lambda r: r[0])
lines.append(current_line)

# 识别大字行
main_text_regions = []
for i, line in enumerate(lines):
if len(line) >= 1: # 即使只有一个字符也可能是正文
line_heights = [h for _, _, _, h in line]
avg_line_height = np.mean(line_heights)

# 大字行的特征
if (avg_line_height >= self.min_char_height and
len(line) >= 1): # 放宽条件

# 计算行内字符间距
if len(line) > 1:
spacings = []
for j in range(1, len(line)):
prev_right = line[j-1][0] + line[j-1][2]
curr_left = line[j][0]
spacings.append(curr_left - prev_right)
avg_spacing = np.mean(spacings) if spacings else 0

# 如果字符间距合理,认为是正文行
if avg_spacing <= avg_line_height * 2:
main_text_regions.extend(line)
else:
# 单字符行也可能是正文
main_text_regions.extend(line)

print(f"识别出 {len(main_text_regions)} 个正文区域")
return main_text_regions

def segment_characters(self, image_path, output_dir="./output_chars", show_windows=False):
"""主函数:分割字符并保存

参数:
image_path: 输入图像路径
output_dir: 输出目录
show_windows: 是否显示可视化窗口(批量处理时建议设为False)
"""
os.makedirs(output_dir, exist_ok=True)

print("正在处理图像...")
try:
original_img, binary_img = self.preprocess_image(image_path)
except Exception as e:
print(f"图像处理错误: {e}")
return []

img_height, img_width = original_img.shape[:2]

print("检测文字区域...")
regions = self.detect_text_regions(binary_img)

# 合并重叠区域
merged_regions = self.merge_overlapping_regions(regions)

# 过滤出大字正文
main_text_regions = self.filter_main_text(merged_regions, img_height)

if not main_text_regions:
print("未检测到大字正文区域,使用所有检测区域")
main_text_regions = merged_regions

# 调整选区大小
adjusted_regions = []
for region in main_text_regions:
adjusted_region = self.adjust_region_size(region, img_width, img_height)
adjusted_regions.append(adjusted_region)

print(f"最终得到 {len(adjusted_regions)} 个调整后的大字区域")

# 按从右到左的顺序排序
adjusted_regions.sort(key=lambda r: r[0], reverse=True)

# 保存单个字符图片
char_images = []
for i, (x, y, w, h) in enumerate(adjusted_regions):
# 确保在图像范围内
x_start = max(0, x)
y_start = max(0, y)
x_end = min(img_width, x + w)
y_end = min(img_height, y + h)

char_img = original_img[y_start:y_end, x_start:x_end]

# 检查图像是否有效
if char_img.size == 0:
print(f"跳过空图像区域: {i}")
continue

output_path = os.path.join(output_dir, f"char_{i:03d}.png")
cv2.imwrite(output_path, char_img)
char_images.append(output_path)

print(f"保存字符 {i:03d}: 位置({x}, {y}), 尺寸({w}x{h})")

# 创建可视化结果
self.create_visualization(original_img, regions, adjusted_regions, output_dir, show_windows)

print(f"处理完成!共分割出 {len(char_images)} 个字符")
return char_images

def create_visualization(self, original_img, all_regions, main_regions, output_dir, show_windows=False):
"""创建可视化结果

参数:
show_windows: 是否显示可视化窗口
"""
result_img = original_img.copy()

# 绘制所有检测到的区域(半透明红色)
for x, y, w, h in all_regions:
overlay = result_img.copy()
cv2.rectangle(overlay, (x, y), (x + w, y + h), (0, 0, 255), -1)
cv2.addWeighted(overlay, 0.3, result_img, 0.7, 0, result_img)
cv2.rectangle(result_img, (x, y), (x + w, y + h), (0, 0, 255), 1)

# 绘制大字正文区域(绿色边框)
for x, y, w, h in main_regions:
cv2.rectangle(result_img, (x, y), (x + w, y + h), (0, 255, 0), 2)

vis_path = os.path.join(output_dir, "segmentation_result.jpg")
cv2.imwrite(vis_path, result_img)
print(f"可视化结果已保存: {vis_path}")

# 只有在需要显示窗口时才显示
if show_windows:
# 调整显示窗口大小
height, width = result_img.shape[:2]
if width > 1200:
scale = 1200 / width
display_img = cv2.resize(result_img, (int(width * scale), int(height * scale)))
else:
display_img = result_img

cv2.imshow('Segmentation Result - Red: All, Green: Main Text', display_img)
print("按任意键关闭窗口...")
cv2.waitKey(0)
cv2.destroyAllWindows()

def interactive_adjustment():
"""交互式参数调整"""
print("=== 古籍文字分割参数调整 ===")

# 基本参数
min_char_width = int(input("最小字符宽度 (默认50): ") or 50)
max_char_width = int(input("最大字符宽度 (默认150): ") or 150)
min_char_height = int(input("最小字符高度 (默认50): ") or 50)
max_char_height = int(input("最大字符高度 (默认150): ") or 150)

# 扩展参数
width_expansion = float(input("宽度扩展比例 (默认0): ") or 0)
height_expansion = float(input("高度扩展比例 (默认0): ") or 0)

# 宽高比参数
min_aspect_ratio = float(input("最小宽高比 (默认0.5): ") or 0.5)
max_aspect_ratio = float(input("最大宽高比 (默认2.0): ") or 2.0)

return AncientTextSegmentor(
min_char_width=min_char_width,
max_char_width=max_char_width,
min_char_height=min_char_height,
max_char_height=max_char_height,
width_expansion=width_expansion,
height_expansion=height_expansion,
min_aspect_ratio=min_aspect_ratio,
max_aspect_ratio=max_aspect_ratio
)

def batch_process_images():
"""批量处理文件夹中的所有图像"""
print("=== 批量处理模式 ===")

# 输入文件夹路径
input_folder = input("请输入包含古籍图像的文件夹路径: ").strip().strip('"')

if not input_folder or not os.path.exists(input_folder):
print("文件夹不存在")
return

# 支持的图像格式
image_extensions = ['*.jpg', '*.jpeg', '*.png', '*.bmp', '*.tiff', '*.tif']
image_files = []

for extension in image_extensions:
image_files.extend(glob.glob(os.path.join(input_folder, extension)))
image_files.extend(glob.glob(os.path.join(input_folder, extension.upper())))

if not image_files:
print("在指定文件夹中未找到图像文件")
return

print(f"找到 {len(image_files)} 个图像文件")

# 选择模式
print("\n选择参数模式:")
print("1. 自动模式 (使用默认参数)")
print("2. 手动调整参数")
mode = input("请选择 (1/2): ").strip()

if mode == "2":
segmentor = interactive_adjustment()
else:
# 使用优化的默认参数
segmentor = AncientTextSegmentor(
min_char_width=50,
max_char_width=150,
min_char_height=50,
max_char_height=150,
width_expansion=0, # 宽度扩展15%
height_expansion=0, # 高度扩展25%
min_aspect_ratio=0.7, # 最小宽高比
max_aspect_ratio=1.5 # 最大宽高比
)

# 询问是否显示窗口
show_windows = input("处理时是否显示可视化窗口?(y/N): ").strip().lower() == 'y'

# 创建主输出目录
main_output_dir = os.path.join(input_folder, "batch_output")
os.makedirs(main_output_dir, exist_ok=True)

# 处理统计
total_images = len(image_files)
processed_count = 0
success_count = 0

print(f"\n开始批量处理 {total_images} 个图像...")
print("批量处理模式下,可视化结果将自动保存为图片,不会弹出窗口阻碍处理流程")

for i, image_path in enumerate(image_files):
print(f"\n{'='*50}")
print(f"处理图像 {i+1}/{total_images}: {os.path.basename(image_path)}")
print(f"{'='*50}")

try:
# 为每个图像创建单独的输出文件夹
image_name = os.path.splitext(os.path.basename(image_path))[0]
output_dir = os.path.join(main_output_dir, image_name)

# 执行分割,批量处理时不显示窗口
char_images = segmentor.segment_characters(image_path, output_dir, show_windows=show_windows)

if char_images:
success_count += 1
print(f"✅ 成功处理: {os.path.basename(image_path)} - 分割出 {len(char_images)} 个字符")
else:
print(f"⚠️ 警告: {os.path.basename(image_path)} - 未分割出字符")

except Exception as e:
print(f"❌ 处理失败: {os.path.basename(image_path)} - 错误: {e}")

processed_count += 1

# 输出处理总结
print(f"\n{'='*60}")
print("批量处理完成!")
print(f"{'='*60}")
print(f"总图像数: {total_images}")
print(f"成功处理: {success_count}")
print(f"失败数量: {processed_count - success_count}")
print(f"输出目录: {main_output_dir}")
print(f"{'='*60}")

def single_image_process():
"""单张图像处理模式"""
print("=== 单张图像处理模式 ===")

# 设置输入图像路径
input_image = input("请输入古籍图像路径: ").strip().strip('"')

if not input_image or not os.path.exists(input_image):
print("文件不存在")
return

# 选择模式
print("\n选择模式:")
print("1. 自动模式 (使用默认参数)")
print("2. 手动调整参数")
mode = input("请选择 (1/2): ").strip()

if mode == "2":
segmentor = interactive_adjustment()
else:
# 使用优化的默认参数
segmentor = AncientTextSegmentor(
min_char_width=50,
max_char_width=150,
min_char_height=50,
max_char_height=150,
width_expansion=0, # 宽度扩展15%
height_expansion=0, # 高度扩展25%
min_aspect_ratio=0.7, # 最小宽高比
max_aspect_ratio=1.5 # 最大宽高比
)

print(f"处理图像: {input_image}")

# 执行分割,单张图像处理时显示窗口
output_dir = "./output_chars"
char_images = segmentor.segment_characters(input_image, output_dir, show_windows=True)

if char_images:
print(f"\n✅ 处理完成!字符图片保存在: {output_dir}")
print(f"共生成 {len(char_images)} 个字符图片")
else:
print("\n❌ 处理失败")

def main():
"""主函数"""
print("=== 古籍文字分割工具 (批量处理版) ===")

while True:
print("\n选择处理模式:")
print("1. 单张图像处理")
print("2. 批量处理文件夹")
print("3. 退出")

choice = input("请选择 (1/2/3): ").strip()

if choice == "1":
single_image_process()
elif choice == "2":
batch_process_images()
elif choice == "3":
print("再见!")
break
else:
print("无效选择,请重新输入")

if __name__ == "__main__":
main()
赤霄游客批量重命名需要建立rename_list.csv文件,第一列“原文件名”第二列“新文件名”,保存为utf-8格式,代码如下:
import os
import csv

def debug_rename(csv_file):
"""
调试版本:显示详细的编码和文件信息
"""
try:
with open(csv_file, 'r', encoding='gbk') as file:
content = file.read()
print("CSV文件原始内容:")
print(repr(content))
print("-" * 60)

# 回到文件开头
file.seek(0)
csv_reader = csv.reader(file)

for i, row in enumerate(csv_reader):
print(f"第{i+1}行: {[repr(cell) for cell in row]}")

if i == 0: # 表头
headers = row
elif len(row) >= 2: # 数据行
old_name = row[0].strip()
new_name = row[1].strip()

print(f" 原文件名: {repr(old_name)}")
print(f" 新文件名: {repr(new_name)}")
print(f" 原文件存在: {os.path.exists(old_name)}")
print(f" 新文件存在: {os.path.exists(new_name)}")
print()

print("=" * 60)
print("建议:检查新文件名是否正确,可能是CSV文件格式问题")
print("如果新文件名显示异常,请检查CSV文件的编码和格式")

except Exception as e:
print(f"调试错误: {e}")

# 先运行调试版本查看问题
debug_rename("file_list.csv")

# 然后询问是否执行重命名
choice = input("\n是否继续执行重命名?(y/N): ")
if choice.lower() == 'y':
batch_rename_safe("file_list.csv")
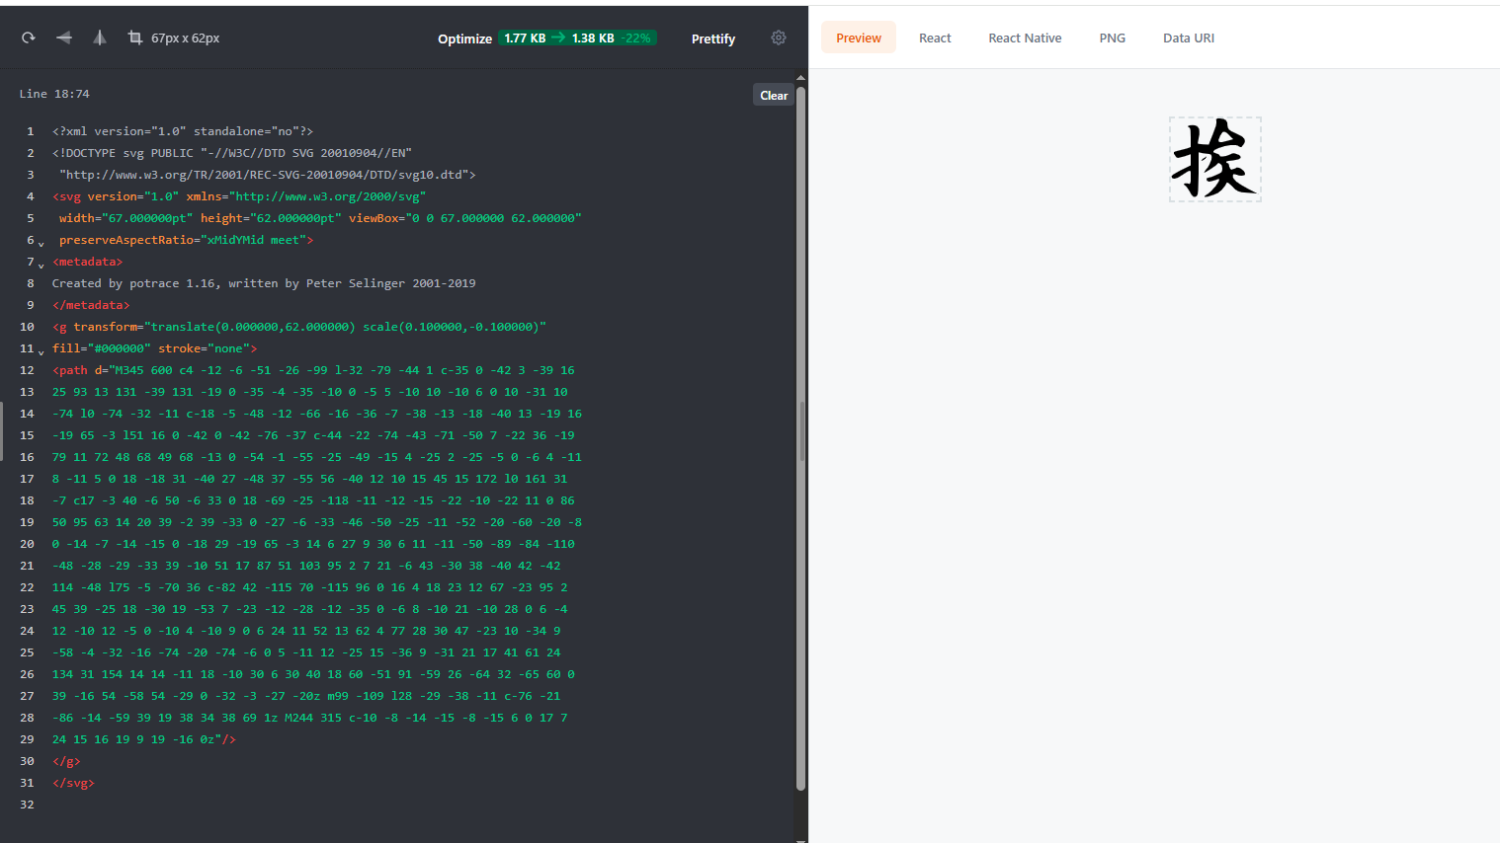
赤霄游客像素图转svg矢量图运行情况
测试效果图
代码
# convert_with_tif_support.py
import os
import subprocess
import tempfile
from PIL import Image
import glob
import sys

def check_tif_support():
"""检查 TIF 支持"""
try:
# 测试是否能打开 TIF 文件
test_img = Image.new('L', (10, 10), 255)
with tempfile.NamedTemporaryFile(suffix='.tif', delete=False) as f:
test_img.save(f.name, format='TIFF')
with Image.open(f.name) as img:
print(f"✅ TIF 格式支持: {img.format}")
os.unlink(f.name)
return True
except Exception as e:
print(f"❌ TIF 格式不支持: {e}")
return False

def convert_image_to_svg(input_file, output_file):
"""使用 potrace 将图像转换为真正的矢量 SVG"""
try:
print(f"转换: {os.path.basename(input_file)}")

# 1. 打开并预处理图像
with Image.open(input_file) as img:
print(f" 原始: {img.size}, {img.mode}, 格式: {img.format}")

# 处理不同格式的特殊情况
if img.format == 'TIFF':
print(" 🖼️ 处理 TIF 文件")
# TIF 文件可能有特殊模式,确保转换为灰度
if img.mode in ['I;16', 'I;16B', 'I;16L', 'I;16N']:
# 16位灰度图像,转换为8位
img = img.point(lambda i: i * (255 / 65535))
img = img.convert('L')
elif img.mode == 'F':
# 浮点图像
img = img.point(lambda i: i * 255)
img = img.convert('L')

# 转换为灰度
if img.mode != 'L':
img = img.convert('L')
print(" 转换为灰度")

# 调整图像大小(如果太大)
max_size = 1000
width, height = img.size
if max(width, height) > max_size:
ratio = max_size / max(width, height)
new_size = (int(width * ratio), int(height * ratio))
img = img.resize(new_size, Image.Resampling.LANCZOS)
print(f" 调整尺寸: {new_size}")

# 创建临时 BMP 文件
with tempfile.NamedTemporaryFile(suffix='.bmp', delete=False) as temp_bmp:
temp_bmp_path = temp_bmp.name
img.save(temp_bmp_path, format='BMP')
print(f" 创建临时文件: {os.path.basename(temp_bmp_path)}")

# 2. 使用 potrace 进行矢量转换
cmd = [
'potrace',
temp_bmp_path,
'-s', # 输出 SVG 格式
'-o', output_file, # 输出文件
'--flat' # 确保完全矢量化
]

print(" 运行 potrace...")
result = subprocess.run(cmd, capture_output=True, text=True)

# 3. 清理临时文件
os.unlink(temp_bmp_path)

if result.returncode == 0:
# 检查输出文件大小
if os.path.exists(output_file):
file_size = os.path.getsize(output_file)
print(f"✅ 成功: {os.path.basename(output_file)} ({file_size} 字节)")
return True
else:
print("❌ 输出文件未生成")
return False
else:
print(f"❌ potrace 错误: {result.stderr}")
return False

except Exception as e:
print(f"❌ 转换失败: {e}")
# 清理临时文件(如果存在)
if 'temp_bmp_path' in locals() and os.path.exists(temp_bmp_path):
os.unlink(temp_bmp_path)
return False

def optimize_svg_for_font(svg_file):
"""优化 SVG 文件,使其更适合字体使用"""
try:
with open(svg_file, 'r', encoding='utf-8') as f:
content = f.read()

# 简单的优化
optimized = content

# 确保有 viewBox
if 'viewBox' not in content and 'width' in content and 'height' in content:
# 从 width 和 height 提取数值
import re
width_match = re.search(r'width="([^"]+)"', content)
height_match = re.search(r'height="([^"]+)"', content)

if width_match and height_match:
width = width_match.group(1)
height = height_match.group(1)
# 移除单位
width_num = ''.join(filter(str.isdigit, width))
height_num = ''.join(filter(str.isdigit, height))
if width_num and height_num:
optimized = optimized.replace(
'<svg ',
f'<svg viewBox="0 0 {width_num} {height_num}" '
)

with open(svg_file, 'w', encoding='utf-8') as f:
f.write(optimized)

return True

except Exception as e:
print(f"优化失败: {e}")
return False

def batch_convert_all_formats():
"""批量转换所有支持的格式"""
print("=== 批量转换工具 (支持 TIF) ===\n")

# 检查 TIF 支持
check_tif_support()

# 查找所有支持的图片文件
supported_formats = ['*.png', '*.jpg', '*.jpeg', '*.bmp', '*.tif', '*.tiff']
files = []

for format in supported_formats:
found_files = glob.glob(format)
files.extend(found_files)
if found_files:
print(f"找到 {format} 文件: {len(found_files)} 个")

if not files:
print("当前目录没有找到支持的图片文件")
print("支持格式: PNG, JPG, JPEG, BMP, TIF, TIFF")
print("当前目录:", os.getcwd())

# 显示当前目录内容
print("\n当前目录内容:")
for item in os.listdir('.'):
if os.path.isfile(item):
print(f" 📄 {item}")
else:
print(f" 📁 {item}/")
return

print(f"\n总共找到 {len(files)} 个文件:")
for file in files:
file_size = os.path.getsize(file)
with Image.open(file) as img:
format_info = img.format
print(f" - {file} ({format_info}, {file_size} 字节)")

# 创建输出目录
output_dir = "vector_svgs"
if not os.path.exists(output_dir):
os.makedirs(output_dir)
print(f"创建输出目录: {output_dir}")

print(f"\n开始转换...")
print("-" * 50)

success_count = 0
failed_files = []

# 转换每个文件
for file in files:
output_file = os.path.join(output_dir, os.path.splitext(os.path.basename(file))[0] + ".svg")

if convert_image_to_svg(file, output_file):
# 优化 SVG 文件
optimize_svg_for_font(output_file)
success_count += 1
else:
failed_files.append(os.path.basename(file))

# 显示结果
print("\n" + "=" * 50)
print("📊 转换结果统计:")
print(f"✅ 成功: {success_count} 个文件")
print(f"❌ 失败: {len(failed_files)} 个文件")
print(f"📁 输出位置: {os.path.abspath(output_dir)}")

if failed_files:
print("\n失败的文件:")
for file in failed_files:
print(f" - {file}")

if success_count > 0:
print(f"\n🎉 矢量转换完成!")
print("这些 SVG 文件包含真正的矢量路径,可以在 FontForge 中使用了")

def preview_svg_files():
"""预览生成的 SVG 文件"""
output_dir = "vector_svgs"

if not os.path.exists(output_dir):
print("输出文件夹不存在")
return

svg_files = glob.glob(os.path.join(output_dir, "*.svg"))

if not svg_files:
print("没有找到 SVG 文件")
return

print(f"\n📁 生成的 SVG 文件 ({len(svg_files)} 个):")
for i, svg_file in enumerate(svg_files[:5], 1):
size = os.path.getsize(svg_file)
with open(svg_file, 'r', encoding='utf-8') as f:
content = f.read()
has_paths = 'path d=' in content
path_count = content.count('path d=')
path_type = f"矢量路径({path_count}个)" if has_paths else "其他"

print(f" {i}. {os.path.basename(svg_file)}")
print(f" 大小: {size} 字节, 类型: {path_type}")

def convert_specific_tif_files():
"""专门处理 TIF 文件的函数"""
print("=== TIF 文件专门处理 ===")

tif_files = glob.glob("*.tif") + glob.glob("*.tiff")

if not tif_files:
print("没有找到 TIF 文件")
return

print(f"找到 {len(tif_files)} 个 TIF 文件:")

for tif_file in tif_files:
print(f"\n处理: {tif_file}")

try:
with Image.open(tif_file) as img:
print(f" 格式: {img.format}, 模式: {img.mode}, 尺寸: {img.size}")

# 显示 TIF 文件信息
if hasattr(img, 'tag'):
print(" TIF 标签信息:")
for tag, value in list(img.tag_v2.items())[:5]: # 只显示前5个标签
print(f" {tag}: {value}")

except Exception as e:
print(f" 读取 TIF 文件信息失败: {e}")

if __name__ == "__main__":
# 显示系统信息
print(f"Python版本: {sys.version}")
print(f"Pillow版本: {Image.__version__}")
print()

# 执行批量转换
batch_convert_all_formats()

# 预览结果
preview_svg_files()

# 专门显示 TIF 文件信息
convert_specific_tif_files()

print(f"\n💡 现在你可以在 FontForge 中导入这些 SVG 文件了!")
阿东游客@赤霄 #197022
真强,感谢分享!我一直在关注做字这一块,在这里见到有人弄了。对了,那个黄令东字体也是这样做的,他在网上也发了原代码,可惜我看不懂。
赤霄游客@阿东 #197023
看不看得懂都没事,传给deepseek,让它读,有问题就问它,根据提示做就好了。
赤霄游客附一个批量调整图片大小的代码,目测会用到。
import cv2
import os
import glob
import numpy as np

def resize_large_tif_opencv(input_folder, output_folder, target_size=(1000, 800)):
"""
使用OpenCV处理大尺寸TIF图片
"""
if not os.path.exists(output_folder):
os.makedirs(output_folder)

tif_files = glob.glob(os.path.join(input_folder, "*.tif")) + \
glob.glob(os.path.join(input_folder, "*.tiff"))

if not tif_files:
print("未找到TIF文件")
return

print(f"找到 {len(tif_files)} 个TIF文件,开始处理...")

success_count = 0

for i, file_path in enumerate(tif_files):
try:
file_size = os.path.getsize(file_path) / (1024 * 1024) # MB
print(f"处理 [{i+1}/{len(tif_files)}]: {os.path.basename(file_path)} ({file_size:.1f} MB)")

# 使用OpenCV读取(支持大文件)
img = cv2.imread(file_path, cv2.IMREAD_UNCHANGED)

if img is None:
print(f" ✗ 无法读取文件")
continue

print(f" 原始尺寸: {img.shape[1]}x{img.shape[0]}")

# 调整大小
resized_img = cv2.resize(img, target_size, interpolation=cv2.INTER_LANCZOS4)

# 保存
filename = os.path.basename(file_path)
output_path = os.path.join(output_folder, filename)

# 尝试不同的压缩方式
try:
cv2.imwrite(output_path, resized_img)
success_count += 1
print(f" ✓ 处理成功")
except Exception as e:
print(f" ✗ 保存失败: {str(e)}")
continue

except Exception as e:
print(f" ✗ 处理失败: {str(e)}")

print(f"\n处理完成!成功处理 {success_count}/{len(tif_files)} 个文件")

# 使用示例
if __name__ == "__main__":
input_folder = "G:\ji2"
output_folder = "G:\ji4"
target_size = (2000, 1600)

resize_large_tif_opencv(input_folder, output_folder, target_size)
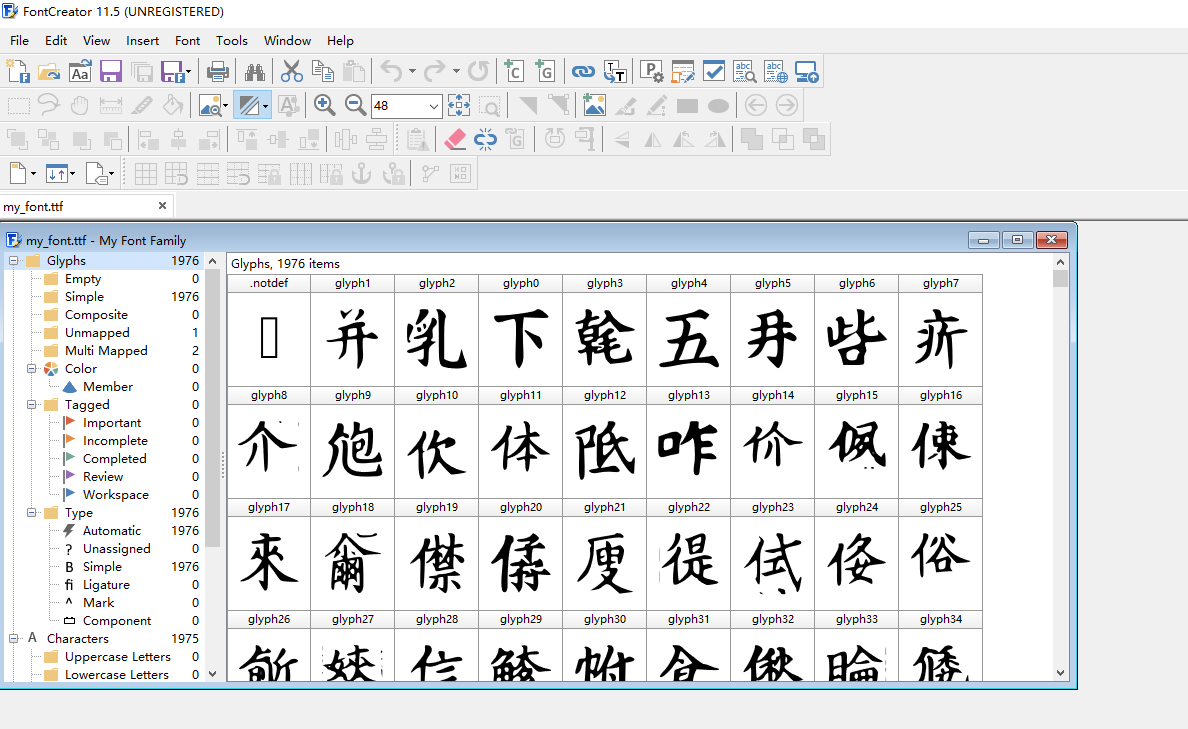
赤霄游客svg矢量图片转字体运行,有些瑕疵,问题不大,成功转字体,字体文件my_font.ttf使用fontforge打开正常。

代码如下:
import subprocess
import os
import tempfile
import sys

def get_fontforge_path():
"""获取FontForge可执行文件路径"""
possible_paths = [
r"C:\Program Files\FontForgeBuilds\bin\fontforge.exe",
r"C:\Program Files (x86)\FontForgeBuilds\fontforge.exe",
r"C:\Program Files\FontForge\fontforge.exe",
]

for path in possible_paths:
if os.path.exists(path):
return path

return possible_paths[0] # 返回默认路径

def create_fontforge_script(svg_dir, output_path):
"""创建FontForge脚本 - 修复编码问题"""
script_content = '''# -*- coding: utf-8 -*-
import fontforge
import os
import sys

def main():
svg_dir = r"{0}"
output_path = r"{1}"

print("Starting font creation...")
print("SVG directory: " + svg_dir)
print("Output file: " + output_path)

# Create new font
font = fontforge.font()
font.fontname = "MyFont"
font.familyname = "My Font Family"
font.fullname = "My Font Regular"
font.weight = "Regular"

# Set font metrics
font.ascent = 800
font.descent = 200

# Check if SVG directory exists
if not os.path.exists(svg_dir):
print("Error: SVG directory does not exist: " + svg_dir)
return 1

# Get SVG files
svg_files = [f for f in os.listdir(svg_dir) if f.lower().endswith('.svg')]

if not svg_files:
print("No SVG files found in directory: " + svg_dir)
return 1

print("Found " + str(len(svg_files)) + " SVG files")

count = 0
for filename in svg_files:
try:
# Get character name from filename
char_name = os.path.splitext(filename)[0]
svg_path = os.path.join(svg_dir, filename)

print("Processing: " + filename)

# Determine Unicode code point
codepoint = 0
if char_name.startswith('uni'):
# uni0041 format
codepoint_str = char_name.replace('uni', '')
codepoint = int(codepoint_str, 16)
elif char_name.startswith('u'):
# u0041 format
codepoint_str = char_name.replace('u', '')
codepoint = int(codepoint_str, 16)
elif char_name.startswith('unicode_'):
# unicode_0041 format
codepoint_str = char_name[8:]
codepoint = int(codepoint_str, 16)
elif len(char_name) == 1:
# Single character name: A.svg
codepoint = ord(char_name)
else:
# Use private use area
codepoint = 0xE000 + (hash(char_name) % 0x1000)
print("Using private use area U+" + format(codepoint, '04X') + " for " + filename)

# Create character
glyph = font.createChar(codepoint)
glyph.importOutlines(svg_path)
glyph.width = 600 # Set character width

count += 1
print("Imported: " + filename + " -> U+" + format(codepoint, '04X'))

except Exception as e:
print("Failed to import " + filename + ": " + str(e))

# Generate font file
print("Generating font file...")
font.generate(output_path)
font.close()

print("Complete! Successfully imported " + str(count) + " characters")
return 0

if __name__ == "__main__":
sys.exit(main())
'''.format(svg_dir, output_path)

# Create temporary script file
with tempfile.NamedTemporaryFile(mode='w', suffix='.py', delete=False, encoding='utf-8') as f:
f.write(script_content)
return f.name

def batch_convert_svg_to_font(svg_dir, output_font):
"""批量转换SVG到字体"""

# 获取FontForge路径
fontforge_path = get_fontforge_path()

if not os.path.exists(fontforge_path):
print(f"错误: FontForge不存在于: {fontforge_path}")
print("请确保已安装FontForge并指定正确路径")
return False

print(f"使用FontForge路径: {fontforge_path}")

# 创建脚本文件
script_path = create_fontforge_script(svg_dir, output_font)

try:
print("开始执行字体生成...")

# 执行FontForge脚本
result = subprocess.run(
[fontforge_path, '-script', script_path],
capture_output=True,
text=True,
encoding='utf-8'
)

# 输出结果
if result.stdout:
print("输出信息:")
print(result.stdout)

if result.stderr:
print("错误信息:")
print(result.stderr)

if result.returncode == 0:
print(f"✓ 字体生成成功: {output_font}")
return True
else:
print(f"✗ 字体生成失败,返回码: {result.returncode}")
return False

except Exception as e:
print(f"执行过程中发生错误: {str(e)}")
return False
finally:
# 清理临时文件
if os.path.exists(script_path):
os.unlink(script_path)

# 使用示例
if __name__ == "__main__":
# 设置SVG目录和输出字体文件
svg_directory = "./svgs" # 修改为你的SVG文件目录
output_font_file = "./my_font.ttf" # 输出的字体文件

# 确保SVG目录存在
if not os.path.exists(svg_directory):
print(f"创建SVG目录: {svg_directory}")
os.makedirs(svg_directory, exist_ok=True)
print(f"请将SVG文件放入 {svg_directory} 目录后重新运行")
else:
# 执行转换
success = batch_convert_svg_to_font(svg_directory, output_font_file)
if success:
print("字体生成完成!")
else:
print("字体生成失败,请检查以上错误信息")
赤霄游客使用fontcraetor发现字体编码并未正确提供,这个导致不能在word等软件调用。
赤霄游客回到重命名步骤,重写脚本,将图片重命名为Unicode字符,也可以用之前的代码,查询到汉字编码后使用正则表达式替换并重新修订csv表格即可。
或者新代码:
import csv
import unicodedata
import codecs

def export_to_csv_excel_friendly(characters, output_file="unicode_results.csv"):
"""
导出为Excel友好的CSV格式(带BOM的UTF-8)
"""
if not characters:
print("没有找到汉字,不创建文件")
return

# 使用BOM写入UTF-8文件,这样Excel就能正确识别编码
with open(output_file, 'w', encoding='utf-8-sig', newline='') as csvfile:
writer = csv.writer(csvfile)
# 写入表头
writer.writerow(['序号', '汉字', 'Unicode', 'UTF-8编码', 'Unicode名称', '字符分类'])

# 写入数据
for i, char in enumerate(characters, 1):
unicode_point = ord(char)
utf8_hex = ' '.join([f'{b:02X}' for b in char.encode('utf-8')])

try:
name = unicodedata.name(char)
category = unicodedata.category(char)
except ValueError:
name = "未知字符"
category = "未知"

writer.writerow([
i,
char,
f"U+{unicode_point:04X}",
utf8_hex,
name,
category
])

print(f"结果已导出到 {output_file},共 {len(characters)} 个汉字")
print("提示:这个CSV文件可以在Excel中正常打开,不会出现乱码")

def batch_export_from_file(input_file, output_file="unicode_results.csv"):
"""
从文件读取并导出(Excel友好版本)
"""
try:
# 尝试多种编码读取文件
encodings = ['utf-8', 'gbk', 'gb2312', 'gb18030', 'big5']
content = None

for encoding in encodings:
try:
with open(input_file, 'r', encoding=encoding) as file:
content = file.read()
print(f"成功使用编码: {encoding}")
break
except UnicodeDecodeError:
continue

if content is None:
# 最后尝试忽略错误
with open(input_file, 'r', encoding='utf-8', errors='ignore') as file:
content = file.read()
print("使用UTF-8并忽略错误字符")

# 提取汉字
chinese_chars = extract_chinese_chars(content)
print(f"找到 {len(chinese_chars)} 个汉字")

# 导出为Excel友好格式
export_to_csv_excel_friendly(chinese_chars, output_file)

except Exception as e:
print(f"出错: {e}")

def extract_chinese_chars(text):
"""提取汉字"""
chinese_chars = []
for char in text:
if '\u4e00' <= char <= '\u9fff':
chinese_chars.append(char)
return sorted(list(set(chinese_chars)))

# 使用示例
if __name__ == "__main__":
batch_export_from_file("input.txt", "excel_friendly.csv")
芥诚游客加油
赤霄游客
许由游客@赤霄 #197086
齐民要术异体字较多,且无善本,能整理一个就牛逼了。
赤霄游客@许由 #197088
刻本相比写本算是呆板的了,为了提升美观度,刻写时多用异体字,目前的电脑字体一般通通合成一个,如果是要排印出来,又更落下乘。
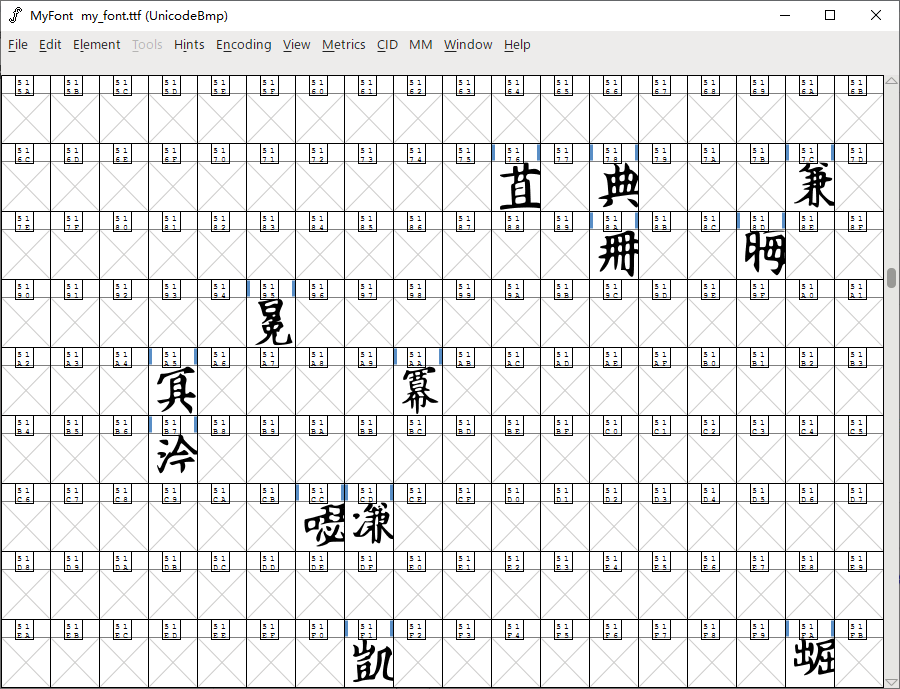
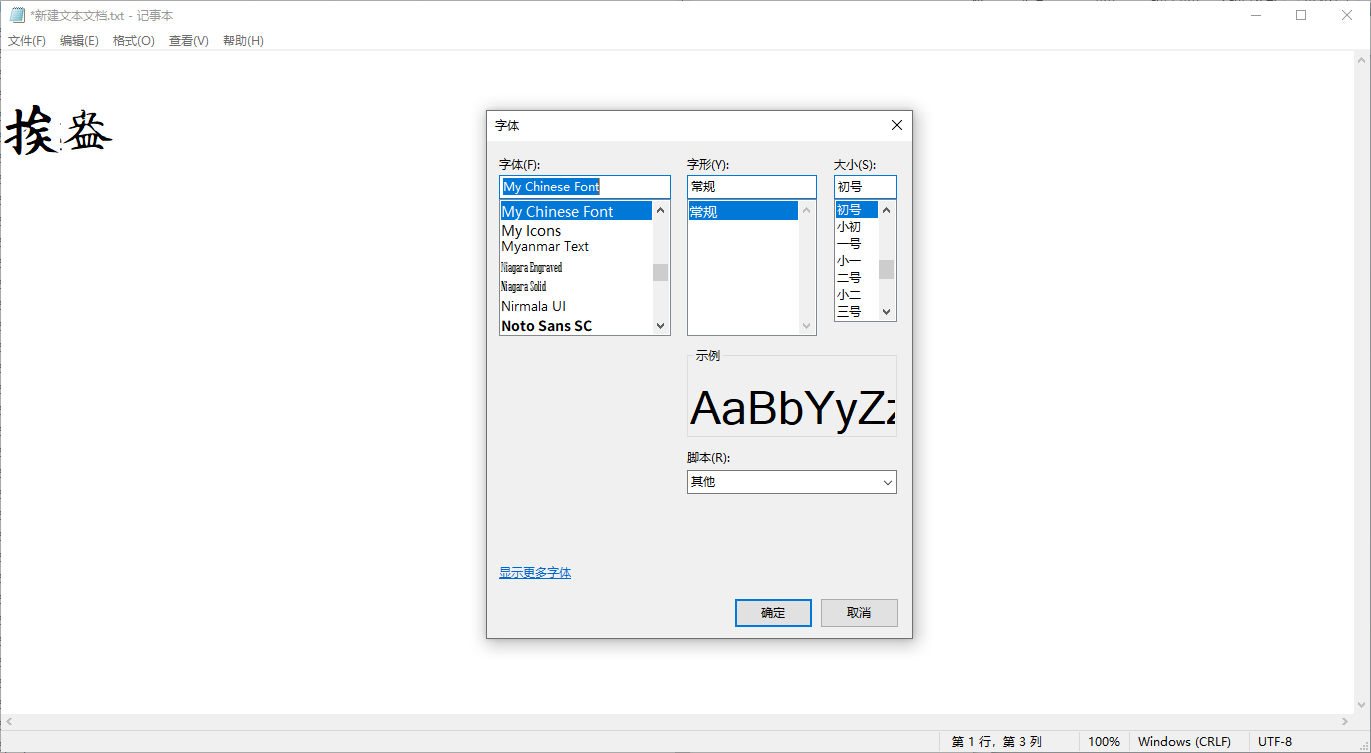
赤霄游客重新修订svg转字体的代码,依然采用汉字命名图片,并且安装字体后完全正常输入,包括了扩展CDEFGH区的不常用汉字。
生成图
记事本输入测试图
代码import subprocess import os import tempfile import sys def get_fontforge_path(): """获取FontForge可执行文件路径""" possible_paths = [ r"C:\Program Files\FontForgeBuilds\bin\fontforge.exe", r"C:\Program Files (x86)\FontForgeBuilds\fontforge.exe", r"C:\Program Files\FontForge\fontforge.exe", ] for path in possible_paths: if os.path.exists(path): return path return possible_paths[0] def create_fontforge_script(svg_dir, output_path): """创建用于汉字超大字符集的FontForge脚本""" script_content = '''# -*- coding: utf-8 -*- import fontforge import os import sys def main(): svg_dir = r"{0}" output_path = r"{1}" print("Starting Chinese font creation...") print("SVG directory: " + svg_dir) # Create new font with proper settings font = fontforge.font() font.fontname = "MyChineseFont" font.familyname = "My Chinese Font" font.fullname = "My Chinese Font Regular" font.weight = "Regular" font.version = "1.0" font.copyright = "Generated by SVG to Font" # 设置中文字体度量 font.ascent = 880 font.descent = 120 font.em = 1000 font.hhea_ascent = 880 font.hhea_descent = -120 font.os2_winascent = 880 font.os2_windescent = 120 font.os2_typoascent = 880 font.os2_typodescent = -120 font.os2_typolinegap = 0 # 设置字体编码为Unicode font.encoding = "UnicodeFull" # 设置CJK相关属性 font.os2_codepages = (0, 1) # Unicode和GB2312 font.os2_panose = (2, 0, 6, 0, 0, 0, 0, 0, 0, 0) # 宋体风格 # Check if SVG directory exists if not os.path.exists(svg_dir): print("Error: SVG directory does not exist: " + svg_dir) return 1 # Get SVG files svg_files = [f for f in os.listdir(svg_dir) if f.lower().endswith('.svg')] if not svg_files: print("No SVG files found in directory: " + svg_dir) return 1 print("Found " + str(len(svg_files)) + " SVG files") # Sort files for consistent ordering svg_files.sort() count = 0 # 汉字Unicode范围定义 cjk_ranges = [ (0x4E00, 0x9FFF), # CJK统一汉字 (0x3400, 0x4DBF), # CJK扩展A (0x20000, 0x2A6DF), # CJK扩展B (0x2A700, 0x2B73F), # CJK扩展C (0x2B740, 0x2B81F), # CJK扩展D (0x2B820, 0x2CEAF), # CJK扩展E (0x2CEB0, 0x2EBEF), # CJK扩展F (0x30000, 0x3134F), # CJK扩展G (0x31350, 0x323AF), # CJK扩展H (0xF900, 0xFAFF), # CJK兼容汉字 (0x2F800, 0x2FA1F), # CJK兼容扩展 ] # 创建文件名到Unicode的映射 filename_to_unicode = {{}} current_codepoint = 0x4E00 # 从基本汉字开始 for filename in svg_files: char_name = os.path.splitext(filename)[0] # 如果文件名是单个汉字,直接使用其Unicode编码 if len(char_name) == 1: codepoint = ord(char_name) # 检查是否在CJK范围内 in_cjk_range = False for start, end in cjk_ranges: if start <= codepoint <= end: in_cjk_range = True break if in_cjk_range: filename_to_unicode[filename] = codepoint continue # 否则按顺序分配编码 assigned = False while not assigned: # 检查当前编码是否在CJK范围内 in_cjk_range = False for start, end in cjk_ranges: if start <= current_codepoint <= end: in_cjk_range = True break if in_cjk_range: filename_to_unicode[filename] = current_codepoint current_codepoint += 1 assigned = True else: current_codepoint += 1 # 防止无限循环 if current_codepoint > 0x323AF: print("Error: Ran out of CJK codepoints") return 1 for filename in svg_files: try: char_name = os.path.splitext(filename)[0] svg_path = os.path.join(svg_dir, filename) codepoint = filename_to_unicode[filename] print("Processing: " + filename + " -> " + char_name + " (U+" + format(codepoint, '04X') + ")") # 创建字符 glyph_name = "uni" + format(codepoint, '04X') glyph = font.createChar(codepoint, glyph_name) # 导入SVG glyph.importOutlines(svg_path) # 清理和优化 glyph.removeOverlap() glyph.simplify() glyph.round() glyph.autoHint() # 设置汉字的标准宽度 glyph.width = 1000 # 自动调整垂直位置 bbox = glyph.boundingBox() if bbox: # 计算居中位置 glyph_height = bbox[3] - bbox[1] target_height = 880 # 基于ascent scale_factor = min(target_height / glyph_height, 1.0) # 不超过em大小 # 缩放并居中 if scale_factor < 0.9 or scale_factor > 1.1: glyph.transform((scale_factor, 0, 0, scale_factor, 0, 0)) bbox = glyph.boundingBox() # 重新获取bbox # 垂直居中 current_center = (bbox[3] + bbox[1]) / 2 target_center = 500 # em的中心 move_y = target_center - current_center glyph.transform((1, 0, 0, 1, 0, move_y)) count += 1 print("Imported: " + filename + " -> U+" + format(codepoint, '04X') + " (" + glyph_name + ")") except Exception as e: print("Failed to import " + filename + ": " + str(e)) import traceback traceback.print_exc() # 生成字体 print("Generating font file...") # 设置字体表信息 font.sfnt_names = [ ('English (US)', 'Family', 'My Chinese Font'), ('English (US)', 'SubFamily', 'Regular'), ('English (US)', 'UniqueID', 'MyChineseFont-Regular'), ('English (US)', 'Fullname', 'My Chinese Font Regular'), ('English (US)', 'Version', 'Version 1.0'), ('English (US)', 'Copyright', 'Generated by SVG to Font') ] # 生成TTF font.generate(output_path, flags=("opentype", "dummy-dsig")) print("Complete! Successfully imported " + str(count) + " Chinese characters") print("Characters cover CJK ranges from U+" + format(min(filename_to_unicode.values()), '04X') + " to U+" + format(max(filename_to_unicode.values()), '04X')) return 0 if __name__ == "__main__": sys.exit(main()) '''.format(svg_dir, output_path) # Create temporary script file with tempfile.NamedTemporaryFile(mode='w', suffix='.py', delete=False, encoding='utf-8') as f: f.write(script_content) return f.name def batch_convert_svg_to_font(svg_dir, output_font): """批量转换SVG到中文字体""" fontforge_path = get_fontforge_path() if not os.path.exists(fontforge_path): print(f"错误: FontForge不存在于: {fontforge_path}") return False print(f"使用FontForge路径: {fontforge_path}") # 创建脚本文件 script_path = create_fontforge_script(svg_dir, output_font) try: print("开始执行字体生成...") result = subprocess.run( [fontforge_path, '-script', script_path], capture_output=True, text=True, encoding='utf-8' ) if result.stdout: print("输出信息:") print(result.stdout) if result.stderr: print("错误信息:") print(result.stderr) if result.returncode == 0: print(f"✓ 字体生成成功: {output_font}") return True else: print(f"✗ 字体生成失败") return False except Exception as e: print(f"执行错误: {str(e)}") return False finally: if os.path.exists(script_path): os.unlink(script_path) def create_character_map(svg_dir, output_map_file): """创建汉字字符映射表""" svg_files = [f for f in os.listdir(svg_dir) if f.lower().endswith('.svg')] svg_files.sort() # CJK范围定义 cjk_ranges = [ (0x4E00, 0x9FFF, "CJK统一汉字"), (0x3400, 0x4DBF, "CJK扩展A"), (0x20000, 0x2A6DF, "CJK扩展B"), (0x2A700, 0x2B73F, "CJK扩展C"), (0x2B740, 0x2B81F, "CJK扩展D"), (0x2B820, 0x2CEAF, "CJK扩展E"), (0x2CEB0, 0x2EBEF, "CJK扩展F"), (0x30000, 0x3134F, "CJK扩展G"), (0x31350, 0x323AF, "CJK扩展H"), (0xF900, 0xFAFF, "CJK兼容汉字"), (0x2F800, 0x2FA1F, "CJK兼容扩展"), ] char_map = [] current_codepoint = 0x4E00 for filename in svg_files: char_name = os.path.splitext(filename)[0] # 确定Unicode编码 if len(char_name) == 1: codepoint = ord(char_name) # 检查是否在CJK范围内 in_cjk_range = False range_name = "非CJK字符" for start, end, name in cjk_ranges: if start <= codepoint <= end: in_cjk_range = True range_name = name break if not in_cjk_range: codepoint = current_codepoint current_codepoint += 1 range_name = "自动分配" else: codepoint = current_codepoint current_codepoint += 1 range_name = "自动分配" # 添加到映射表 if codepoint <= 0xFFFF: char_map.append(f"{char_name}: U+{format(codepoint, '04X')} -> '{chr(codepoint)}' [{range_name}]") else: # 对于扩展B及以后的字符,使用代理对表示 try: char_repr = chr(codepoint) char_map.append(f"{char_name}: U+{format(codepoint, '05X')} -> '{char_repr}' [{range_name}]") except: char_map.append(f"{char_name}: U+{format(codepoint, '05X')} -> [补充平面字符] [{range_name}]") with open(output_map_file, 'w', encoding='utf-8') as f: f.write("汉字字体字符映射表\n") f.write("=" * 60 + "\n") f.write("支持的CJK Unicode范围:\n") for start, end, name in cjk_ranges: if start <= 0xFFFF: f.write(f" {name}: U+{format(start, '04X')}-U+{format(end, '04X')}\n") else: f.write(f" {name}: U+{format(start, '05X')}-U+{format(end, '05X')}\n") f.write("\n在Word中使用方法:\n") f.write("1. 安装生成的字体\n") f.write("2. 直接输入对应汉字\n") f.write("3. 将字体切换为 'My Chinese Font'\n") f.write("4. 或者使用字符映射表中的Unicode编码\n\n") f.write("字符映射:\n") f.write("\n".join(char_map)) print(f"✓ 字符映射表已生成: {output_map_file}") def validate_svg_files(svg_dir): """验证SVG文件命名""" svg_files = [f for f in os.listdir(svg_dir) if f.lower().endswith('.svg')] # CJK范围定义(仅用于验证) cjk_ranges_validation = [ (0x4E00, 0x9FFF), (0x3400, 0x4DBF), (0x20000, 0x2A6DF), (0x2A700, 0x2B73F), (0x2B740, 0x2B81F), (0x2B820, 0x2CEAF), (0x2CEB0, 0x2EBEF), (0x30000, 0x3134F), (0x31350, 0x323AF), (0xF900, 0xFAFF), (0x2F800, 0x2FA1F) ] print("SVG文件验证结果:") for filename in svg_files: char_name = os.path.splitext(filename)[0] if len(char_name) == 1: codepoint = ord(char_name) # 检查是否汉字 is_chinese = any(start <= codepoint <= end for start, end in cjk_ranges_validation) if is_chinese: # 确定具体范围 range_name = "CJK字符" if 0x4E00 <= codepoint <= 0x9FFF: range_name = "基本汉字" elif 0x3400 <= codepoint <= 0x4DBF: range_name = "扩展A" elif 0xF900 <= codepoint <= 0xFAFF: range_name = "兼容汉字" elif codepoint >= 0x20000: range_name = "扩展B+" print(f" ✓ {filename} -> 汉字 '{char_name}' ({range_name})") else: print(f" ⚠ {filename} -> 非汉字字符 '{char_name}' (U+{format(codepoint, '04X')})") else: print(f" ℹ {filename} -> 多字符名称 '{char_name}' (将自动分配编码)") # 使用示例 if __name__ == "__main__": svg_directory = "./hanzi_svgs" output_font_file = "./my_chinese_font.ttf" output_map_file = "./chinese_character_map.txt" if not os.path.exists(svg_directory): print(f"创建SVG目录: {svg_directory}") os.makedirs(svg_directory, exist_ok=True) print(f"请将汉字SVG文件放入 {svg_directory} 目录后重新运行") print("SVG文件命名建议:") print(" 最佳方式: 单个汉字命名,如:的.svg 一.svg 龍.svg 龜.svg") print(" 其他方式: 任意名称,系统会自动分配CJK编码") print("") print("支持所有CJK汉字范围:") print(" - CJK统一汉字 (U+4E00-U+9FFF)") print(" - CJK扩展A-H (U+3400-U+4DBF, U+20000-U+323AF)") print(" - CJK兼容汉字 (U+F900-U+FAFF, U+2F800-U+2FA1F)") else: # 验证文件 validate_svg_files(svg_directory) print("") success = batch_convert_svg_to_font(svg_directory, output_font_file) if success: create_character_map(svg_directory, output_map_file) print("\n使用说明:") print("1. 安装 my_chinese_font.ttf 字体") print("2. 查看 chinese_character_map.txt 获取完整字符映射") print("3. 在支持Unicode的软件中直接输入汉字使用") print("4. 字体名称: 'My Chinese Font'") else: print("字体生成失败")
赤霄游客试验流程圆满结束。
阿东游客@赤霄 #197091
能否发一会所运行毎一步用到了软件给我一份,我也想试试。
赤霄游客@阿东 #197099
ok,等下我把软件也扔网盘里,使用顺序:先安装python、fontforge、umiocr,直接运行脚本文件.python,有问题就把脚本和问题都给deepseek,根据提示处理即可。python脚本使用顺序:切图、识别、转图、成字。
赤霄游客识别是单独用umiocr,不依赖python。
赤霄游客python安装搜教程,不要自己随便装,这样是用不起的。
阿东游客@赤霄 #197102
谢谢了,一会我上去下,真心感谢!
赤霄游客@阿东 #197106
传好了,久闻Python大名,没想到使用极其简单,打开IDLE—>file—>open—>run—>runmodule或者file—>newfile—>save—>run—>runmodule
雲灬甫游客几年前就开始做了,慢慢才调整了4000多个字。
书格书友游客小弟非常希望能出现“开成石经”字体
张飞白游客@赤霄 #196934
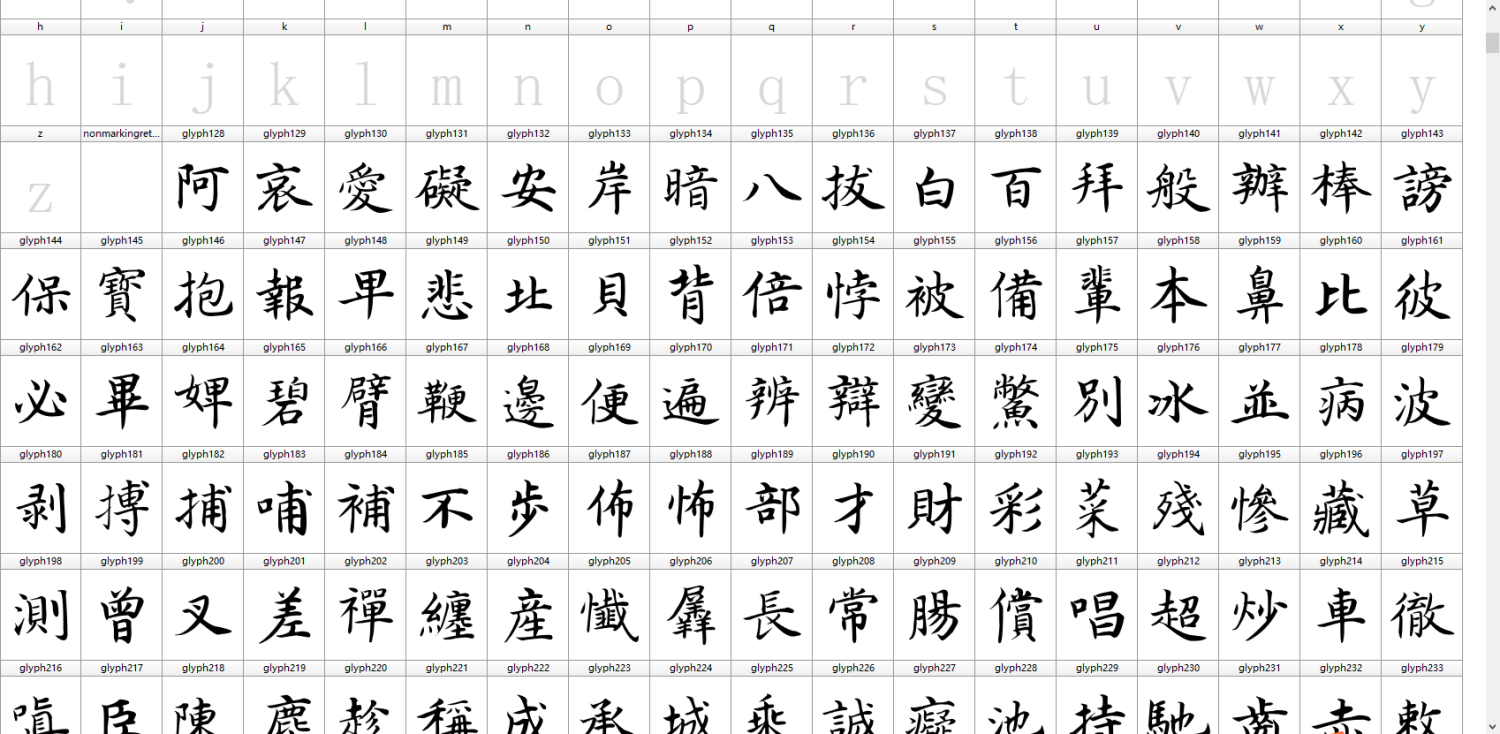
关于做古籍字体,几年前也做过研究和尝试,但因为种原因没有成功。有兴趣的朋友可以参考github上的“令东齐伋体”的开源代码,思路上应该有些帮助。
关于切字,提供一个思路,一般来说古籍ocr网站或应用在返回识别结果时,会返回书叶中每个字的字义及所在坐标,这个东西可以加以利用,直接把书叶中的字裁切保存下来,这样大大节省切字的时间和精力——可能很少人关注到这点,同样令东齐伋体也没有用这个方法
后续就是挑字,以及把字体进行微调及封装到字体文件里。但字形之间的大小统一问题也要考虑,可能需要逐个调或批处理
@雲灬甫 #197123
古籍字体的字数是大问题,除了字典等书籍(如康熙字典),一般的古籍,全部切下来,能有不重复的五六千字形就不错了,这还不够……后续可能还需要增加字形
善行天下游客
善行天下游客@雲灬甫 #197123 你这个是什么字体?
阿东游客
赤霄游客@张飞白 #197183
可以试试这个脚本,利用paddle识别过程中的坐标切割文字区域。
import cv2
import numpy as np
from paddleocr import PaddleOCR
import os
from PIL import Image
import matplotlib.pyplot as pltclass TextRegionExtractor:
def __init__(self, use_angle_cls=True, lang='ch'):
"""
初始化PaddleOCR识别器
Args:
use_angle_cls: 是否使用角度分类
lang: 识别语言 ('ch', 'en', 'fr', 'german', 'korean', 'japan')
"""
self.ocr = PaddleOCR(use_angle_cls=use_angle_cls, lang=lang)def extract_text_regions(self, image_path, output_dir='output'):
"""
提取图像中的文字区域
Args:
image_path: 输入图像路径
output_dir: 输出目录
Returns:
regions_info: 文字区域信息列表
"""
# 创建输出目录
os.makedirs(output_dir, exist_ok=True)# 读取图像
if isinstance(image_path, str):
image = cv2.imread(image_path)
image_rgb = cv2.cvtColor(image, cv2.COLOR_BGR2RGB)
else:
image_rgb = image_path
image = cv2.cvtColor(image_rgb, cv2.COLOR_RGB2BGR)# 使用PaddleOCR进行文字识别
result = self.ocr.ocr(image_rgb, cls=True)regions_info = []
if result and result[0]:
for idx, line in enumerate(result[0]):
if line:
# 获取坐标和文本
coordinates = line[0]
text = line[1][0]
confidence = line[1][1]# 将坐标转换为整数
coords = np.array(coordinates, dtype=np.int32)# 提取文字区域
region_image = self._extract_region(image, coords)if region_image is not None:
# 保存区域图像
output_path = os.path.join(output_dir, f'text_region_{idx}.png')
cv2.imwrite(output_path, region_image)# 保存区域信息
region_info = {
'id': idx,
'coordinates': coords.tolist(),
'text': text,
'confidence': confidence,
'output_path': output_path
}
regions_info.append(region_info)print(f"区域 {idx}: 文本='{text}', 置信度={confidence:.4f}")
return regions_info
def _extract_region(self, image, coordinates):
"""
根据坐标提取图像区域
Args:
image: 原始图像
coordinates: 四边形坐标
Returns:
region: 提取的区域图像
"""
try:
# 创建掩码
mask = np.zeros(image.shape[:2], dtype=np.uint8)
cv2.fillPoly(mask, [coordinates], 255)# 应用掩码
masked_image = cv2.bitwise_and(image, image, mask=mask)# 获取边界框
x, y, w, h = cv2.boundingRect(coordinates)# 提取区域
region = masked_image[y:y+h, x:x+w]return region
except Exception as e:
print(f"提取区域时出错: {e}")
return Nonedef visualize_results(self, image_path, regions_info, save_path=None):
"""
可视化识别结果
Args:
image_path: 原始图像路径
regions_info: 区域信息列表
save_path: 保存路径
"""
# 读取图像
image = cv2.imread(image_path)
image_with_boxes = image.copy()# 绘制边界框
for region in regions_info:
coords = np.array(region['coordinates'], dtype=np.int32)# 绘制多边形
cv2.polylines(image_with_boxes, [coords], True, (0, 255, 0), 2)# 添加文本标签
center_x = int(np.mean(coords[:, 0]))
center_y = int(np.mean(coords[:, 1]))
cv2.putText(image_with_boxes, region['text'], (center_x, center_y-10),
cv2.FONT_HERSHEY_SIMPLEX, 0.5, (255, 0, 0), 1)# 显示或保存结果
if save_path:
cv2.imwrite(save_path, image_with_boxes)
print(f"可视化结果已保存至: {save_path}")# 显示图像
plt.figure(figsize=(12, 8))
plt.imshow(cv2.cvtColor(image_with_boxes, cv2.COLOR_BGR2RGB))
plt.title('文字区域识别结果')
plt.axis('off')
plt.show()def main():
# 初始化提取器
extractor = TextRegionExtractor(lang='ch') # 根据需求修改语言# 输入图像路径
image_path = 'input_image.jpg' # 替换为您的图像路径# 提取文字区域
regions_info = extractor.extract_text_regions(image_path, 'text_regions')# 打印结果摘要
print(f"\n共识别到 {len(regions_info)} 个文字区域")# 可视化结果
extractor.visualize_results(image_path, regions_info, 'visualization_result.jpg')if __name__ == "__main__":
main()
赤霄游客还可以补充手动框选和重新框选已识别不准确的,脚本代码:
import cv2
import numpy as np
import os
import globclass AncientTextSegmentor:
def __init__(self, min_char_width=20, max_char_width=100, min_char_height=30, max_char_height=100,
width_expansion=0.2, height_expansion=0.3, min_aspect_ratio=0.5, max_aspect_ratio=2.0):
"""
初始化古籍文字分割器 - 二值化图像专用
"""
self.min_char_width = min_char_width
self.max_char_width = max_char_width
self.min_char_height = min_char_height
self.max_char_height = max_char_height
self.width_expansion = width_expansion
self.height_expansion = height_expansion
self.min_aspect_ratio = min_aspect_ratio
self.max_aspect_ratio = max_aspect_ratio
self.manual_regions = [] # 存储手动添加的区域
self.removed_regions = [] # 存储被删除的错误区域def preprocess_image(self, image_path):
"""图像预处理 - 专为二值化图像优化"""
print(f"尝试读取图像: {image_path}")if not os.path.exists(image_path):
raise ValueError(f"文件不存在: {image_path}")# 读取图像
img = cv2.imread(image_path)
if img is None:
try:
with open(image_path, 'rb') as f:
img_data = np.frombuffer(f.read(), np.uint8)
img = cv2.imdecode(img_data, cv2.IMREAD_COLOR)
except Exception as e:
raise ValueError(f"无法读取图像文件: {e}")if img is None:
raise ValueError("无法读取图像文件")print(f"图像读取成功,尺寸: {img.shape}")
# 如果已经是单通道,直接使用
if len(img.shape) == 2:
gray = img
else:
gray = cv2.cvtColor(img, cv2.COLOR_BGR2GRAY)# 确保是二值图像 (0和255)
_, binary = cv2.threshold(gray, 127, 255, cv2.THRESH_BINARY)# 反转图像,确保文字为白色(255),背景为黑色(0)
binary = cv2.bitwise_not(binary)return img, binary
def detect_text_regions(self, binary_img):
"""检测文本区域 - 二值化图像专用"""
# 使用更精细的形态学操作
kernel_tiny = cv2.getStructuringElement(cv2.MORPH_RECT, (1, 1))
kernel_small = cv2.getStructuringElement(cv2.MORPH_RECT, (2, 2))# 对于二值化图像,减少形态学操作强度
cleaned = cv2.morphologyEx(binary_img, cv2.MORPH_OPEN, kernel_tiny)
connected = cv2.morphologyEx(cleaned, cv2.MORPH_CLOSE, kernel_small)# 查找轮廓
contours, _ = cv2.findContours(
connected, cv2.RETR_EXTERNAL, cv2.CHAIN_APPROX_SIMPLE
)# 放宽筛选条件
char_regions = []
for contour in contours:
x, y, w, h = cv2.boundingRect(contour)aspect_ratio = w / h if h > 0 else 0
area = w * hif (h >= self.min_char_height * 0.8 and
w >= self.min_char_width * 0.8 and
w <= self.max_char_width * 1.2 and
h <= self.max_char_height * 1.2 and
self.min_aspect_ratio * 0.7 <= aspect_ratio <= self.max_aspect_ratio * 1.3 and
area > 50 and area < 100000):char_regions.append((x, y, w, h))
print(f"初步检测到 {len(char_regions)} 个候选区域")
return char_regionsdef adjust_region_size(self, region, img_width, img_height):
"""调整选区大小"""
x, y, w, h = regionwidth_padding = int(w * self.width_expansion)
height_padding = int(h * self.height_expansion)new_x = max(0, x - width_padding)
new_y = max(0, y - height_padding)
new_w = min(img_width - new_x, w + 2 * width_padding)
new_h = min(img_height - new_y, h + 2 * height_padding)return (new_x, new_y, new_w, new_h)
def merge_overlapping_regions(self, regions, overlap_threshold=0.2):
"""合并重叠的区域 - 更宽松的合并策略"""
if not regions:
return []regions.sort(key=lambda r: r[2] * r[3], reverse=True)
merged_regions = []
used = [False] * len(regions)for i, (x1, y1, w1, h1) in enumerate(regions):
if used[i]:
continuecurrent_region = (x1, y1, w1, h1)
for j, (x2, y2, w2, h2) in enumerate(regions[i+1:], i+1):
if used[j]:
continueoverlap_x = max(x1, x2)
overlap_y = max(y1, y2)
overlap_w = min(x1 + w1, x2 + w2) - overlap_x
overlap_h = min(y1 + h1, y2 + h2) - overlap_yif overlap_w > 0 and overlap_h > 0:
overlap_area = overlap_w * overlap_h
area1 = w1 * h1
area2 = w2 * h2if overlap_area / min(area1, area2) > overlap_threshold:
new_x = min(x1, x2)
new_y = min(y1, y2)
new_w = max(x1 + w1, x2 + w2) - new_x
new_h = max(y1 + h1, y2 + h2) - new_y
current_region = (new_x, new_y, new_w, new_h)
used[j] = Truemerged_regions.append(current_region)
used[i] = Trueprint(f"区域合并: {len(regions)} -> {len(merged_regions)}")
return merged_regionsdef filter_main_text(self, regions, img_height):
"""过滤出大字正文 - 改进版"""
if not regions:
return []regions.sort(key=lambda r: r[1])
heights = [h for _, _, _, h in regions]
avg_height = np.mean(heights) if heights else self.min_char_heightlines = []
current_line = []
line_y = -1for region in regions:
x, y, w, h = regionif line_y == -1:
line_y = y
current_line.append(region)
elif abs(y - line_y) <= avg_height * 1.0:
current_line.append(region)
else:
if current_line:
current_line.sort(key=lambda r: r[0])
lines.append(current_line)
current_line = [region]
line_y = yif current_line:
current_line.sort(key=lambda r: r[0])
lines.append(current_line)main_text_regions = []
for i, line in enumerate(lines):
if len(line) >= 1:
line_heights = [h for _, _, _, h in line]
avg_line_height = np.mean(line_heights)if (avg_line_height >= self.min_char_height * 0.8 and
len(line) >= 1):if len(line) > 1:
spacings = []
for j in range(1, len(line)):
prev_right = line[j-1][0] + line[j-1][2]
curr_left = line[j][0]
spacings.append(curr_left - prev_right)
avg_spacing = np.mean(spacings) if spacings else 0if avg_spacing <= avg_line_height * 3:
main_text_regions.extend(line)
else:
main_text_regions.extend(line)print(f"识别出 {len(main_text_regions)} 个正文区域")
return main_text_regionsdef manual_region_selection(self, image, existing_regions):
"""手动区域选择功能 - 增强版:支持添加和删除区域"""
print("\n=== 手动区域选择模式 ===")
print("操作说明:")
print("- 按住鼠标左键拖动来绘制矩形框")
print("- 按 's' 键保存当前框选")
print("- 按 'd' 键删除最后一个手动框选")
print("- 按 'r' 键删除选中的自动框选")
print("- 按 'c' 键清除所有手动框选")
print("- 按 'a' 键显示/隐藏自动检测区域")
print("- 按 'q' 键完成手动选择")
print("- 按 'h' 键显示帮助信息")# 调整图像大小以便显示
height, width = image.shape[:2]
if width > 1200:
scale = 1200 / width
display_width = int(width * scale)
display_height = int(height * scale)
else:
display_width = width
display_height = heighttemp_image = cv2.resize(image.copy(), (display_width, display_height))
scale_x = width / display_width
scale_y = height / display_heightmanual_regions = [] # 存储手动添加的区域(原始坐标)
removed_regions = [] # 存储被删除的自动区域
current_region = None
drawing = False
ix, iy = -1, -1
show_auto_regions = True # 是否显示自动检测区域def mouse_callback(event, x, y, flags, param):
nonlocal temp_image, current_region, drawing, ix, iyif event == cv2.EVENT_LBUTTONDOWN:
drawing = True
ix, iy = x, y
current_region = [x, y, 0, 0]elif event == cv2.EVENT_MOUSEMOVE:
if drawing:
temp_image = cv2.resize(image.copy(), (display_width, display_height))
self._draw_regions(temp_image, existing_regions, manual_regions, removed_regions,
scale_x, scale_y, show_auto_regions)# 绘制当前正在框选的区域
cv2.rectangle(temp_image, (ix, iy), (x, y), (0, 255, 0), 2)elif event == cv2.EVENT_LBUTTONUP:
drawing = False
current_region[2] = abs(x - ix)
current_region[3] = abs(y - iy)if current_region[2] > 0 and current_region[3] > 0:
# 调整坐标,确保x,y是左上角
if x < ix:
current_region[0] = x
if y < iy:
current_region[1] = ytemp_image = cv2.resize(image.copy(), (display_width, display_height))
self._draw_regions(temp_image, existing_regions, manual_regions, removed_regions,
scale_x, scale_y, show_auto_regions)# 绘制当前框选区域(绿色)
cv2.rectangle(temp_image,
(current_region[0], current_region[1]),
(current_region[0] + current_region[2], current_region[1] + current_region[3]),
(0, 255, 0), 2)# 创建窗口并设置鼠标回调
window_name = "Manual Region Selection - Press 'h' for help"
cv2.namedWindow(window_name, cv2.WINDOW_NORMAL)
cv2.resizeWindow(window_name, display_width, display_height)
cv2.setMouseCallback(window_name, mouse_callback)# 初始绘制
temp_image = cv2.resize(image.copy(), (display_width, display_height))
self._draw_regions(temp_image, existing_regions, manual_regions, removed_regions,
scale_x, scale_y, show_auto_regions)print("手动选择窗口已打开,请查看...")
while True:
cv2.imshow(window_name, temp_image)
key = cv2.waitKey(1) & 0xFFif key == ord('s') and current_region is not None: # 保存当前框选
# 转换回原始坐标
orig_x = int(current_region[0] * scale_x)
orig_y = int(current_region[1] * scale_y)
orig_w = int(current_region[2] * scale_x)
orig_h = int(current_region[3] * scale_y)manual_regions.append((orig_x, orig_y, orig_w, orig_h))
print(f"添加手动区域 {len(manual_regions)}: 位置({orig_x}, {orig_y}), 尺寸({orig_w}x{orig_h})")
current_region = None# 更新显示
temp_image = cv2.resize(image.copy(), (display_width, display_height))
self._draw_regions(temp_image, existing_regions, manual_regions, removed_regions,
scale_x, scale_y, show_auto_regions)elif key == ord('d'): # 删除最后一个手动框选
if manual_regions:
removed = manual_regions.pop()
print(f"删除手动区域: 位置({removed[0]}, {removed[1]}), 尺寸({removed[2]}x{removed[3]})")
temp_image = cv2.resize(image.copy(), (display_width, display_height))
self._draw_regions(temp_image, existing_regions, manual_regions, removed_regions,
scale_x, scale_y, show_auto_regions)elif key == ord('r'): # 删除选中的自动区域
if current_region is not None:
# 转换当前框选到原始坐标
orig_x = int(current_region[0] * scale_x)
orig_y = int(current_region[1] * scale_y)
orig_w = int(current_region[2] * scale_x)
orig_h = int(current_region[3] * scale_y)# 找到与当前框选重叠的自动区域
for i, (rx, ry, rw, rh) in enumerate(existing_regions):
if (abs(rx - orig_x) < 20 and abs(ry - orig_y) < 20 and
abs(rw - orig_w) < 20 and abs(rh - orig_h) < 20):if (rx, ry, rw, rh) not in removed_regions:
removed_regions.append((rx, ry, rw, rh))
print(f"标记删除自动区域 {i}: 位置({rx}, {ry}), 尺寸({rw}x{rh})")
breakcurrent_region = None
temp_image = cv2.resize(image.copy(), (display_width, display_height))
self._draw_regions(temp_image, existing_regions, manual_regions, removed_regions,
scale_x, scale_y, show_auto_regions)elif key == ord('c'): # 清除所有手动框选
manual_regions.clear()
print("清除所有手动框选")
temp_image = cv2.resize(image.copy(), (display_width, display_height))
self._draw_regions(temp_image, existing_regions, manual_regions, removed_regions,
scale_x, scale_y, show_auto_regions)elif key == ord('a'): # 切换显示自动区域
show_auto_regions = not show_auto_regions
print(f"{'显示' if show_auto_regions else '隐藏'}自动检测区域")
temp_image = cv2.resize(image.copy(), (display_width, display_height))
self._draw_regions(temp_image, existing_regions, manual_regions, removed_regions,
scale_x, scale_y, show_auto_regions)elif key == ord('h'): # 显示帮助
print("\n操作说明:")
print("- 按住鼠标左键拖动来绘制矩形框")
print("- 按 's' 键保存当前框选")
print("- 按 'd' 键删除最后一个手动框选")
print("- 按 'r' 键删除选中的自动框选")
print("- 按 'c' 键清除所有手动框选")
print("- 按 'a' 键显示/隐藏自动检测区域")
print("- 按 'q' 键完成手动选择")elif key == ord('q'): # 退出
breakcv2.destroyWindow(window_name)
print(f"手动选择完成,添加了 {len(manual_regions)} 个手动区域,删除了 {len(removed_regions)} 个自动区域")
return manual_regions, removed_regionsdef _draw_regions(self, image, existing_regions, manual_regions, removed_regions, scale_x, scale_y, show_auto=True):
"""绘制所有区域到图像上"""
# 绘制自动检测的区域(蓝色边框)
if show_auto:
for i, (rx, ry, rw, rh) in enumerate(existing_regions):
# 检查是否被标记删除
is_removed = any(
abs(rx - rx_rem) < 5 and abs(ry - ry_rem) < 5 and
abs(rw - rw_rem) < 5 and abs(rh - rh_rem) < 5
for rx_rem, ry_rem, rw_rem, rh_rem in removed_regions
)if not is_removed:
# 缩放坐标到显示尺寸
rx_disp = int(rx / scale_x)
ry_disp = int(ry / scale_y)
rw_disp = int(rw / scale_x)
rh_disp = int(rh / scale_y)
cv2.rectangle(image, (rx_disp, ry_disp), (rx_disp + rw_disp, ry_disp + rh_disp), (255, 0, 0), 2)
cv2.putText(image, f'A{i}', (rx_disp, ry_disp-5), cv2.FONT_HERSHEY_SIMPLEX, 0.5, (255, 0, 0), 1)
else:
# 绘制被删除的区域(红色边框)
rx_disp = int(rx / scale_x)
ry_disp = int(ry / scale_y)
rw_disp = int(rw / scale_x)
rh_disp = int(rh / scale_y)
cv2.rectangle(image, (rx_disp, ry_disp), (rx_disp + rw_disp, ry_disp + rh_disp), (0, 0, 255), 2)
cv2.putText(image, f'X{i}', (rx_disp, ry_disp-5), cv2.FONT_HERSHEY_SIMPLEX, 0.5, (0, 0, 255), 1)# 绘制手动添加的区域(黄色边框)
for i, (rx, ry, rw, rh) in enumerate(manual_regions):
rx_disp = int(rx / scale_x)
ry_disp = int(ry / scale_y)
rw_disp = int(rw / scale_x)
rh_disp = int(rh / scale_y)
cv2.rectangle(image, (rx_disp, ry_disp), (rx_disp + rw_disp, ry_disp + rh_disp), (0, 255, 255), 2)
cv2.putText(image, f'M{i}', (rx_disp, ry_disp-5), cv2.FONT_HERSHEY_SIMPLEX, 0.5, (0, 255, 255), 1)def segment_characters(self, image_path, output_dir="./output_chars", show_windows=False, enable_manual=False):
"""主函数:分割字符并保存 - 增强调试信息"""
os.makedirs(output_dir, exist_ok=True)print("正在处理图像...")
try:
original_img, binary_img = self.preprocess_image(image_path)
except Exception as e:
print(f"图像处理错误: {e}")
return []img_height, img_width = original_img.shape[:2]
print("检测文字区域...")
regions = self.detect_text_regions(binary_img)# 输出区域统计信息
if regions:
widths = [w for _, _, w, _ in regions]
heights = [h for _, _, _, h in regions]
print(f"区域尺寸统计 - 宽度: min={min(widths)}, max={max(widths)}, avg={np.mean(widths):.1f}")
print(f"区域尺寸统计 - 高度: min={min(heights)}, max={max(heights)}, avg={np.mean(heights):.1f}")# 合并重叠区域
merged_regions = self.merge_overlapping_regions(regions)# 过滤出大字正文
main_text_regions = self.filter_main_text(merged_regions, img_height)if not main_text_regions:
print("未检测到大字正文区域,使用所有检测区域")
main_text_regions = merged_regions# 手动补框选和删除错误区域
manual_regions = []
removed_regions = []
if enable_manual:
use_manual = input("\n是否启用手动补框选和删除错误区域?(y/N): ").strip().lower()
if use_manual == 'y':
print("正在打开手动选择窗口...")
manual_regions, removed_regions = self.manual_region_selection(original_img, main_text_regions)
if manual_regions:
print(f"添加了 {len(manual_regions)} 个手动区域")
if removed_regions:
print(f"删除了 {len(removed_regions)} 个自动区域")# 过滤掉被删除的区域
filtered_regions = []
for region in main_text_regions:
is_removed = any(
abs(region[0] - removed[0]) < 5 and abs(region[1] - removed[1]) < 5 and
abs(region[2] - removed[2]) < 5 and abs(region[3] - removed[3]) < 5
for removed in removed_regions
)
if not is_removed:
filtered_regions.append(region)# 添加手动区域
final_regions = filtered_regions + manual_regions# 调整选区大小
adjusted_regions = []
for region in final_regions:
adjusted_region = self.adjust_region_size(region, img_width, img_height)
adjusted_regions.append(adjusted_region)print(f"最终得到 {len(adjusted_regions)} 个调整后的区域 (自动: {len(filtered_regions)}, 手动: {len(manual_regions)}, 删除: {len(removed_regions)})")
# 按从右到左的顺序排序
adjusted_regions.sort(key=lambda r: r[0], reverse=True)# 保存单个字符图片
char_images = []
for i, (x, y, w, h) in enumerate(adjusted_regions):
# 确保在图像范围内
x_start = max(0, x)
y_start = max(0, y)
x_end = min(img_width, x + w)
y_end = min(img_height, y + h)char_img = original_img[y_start:y_end, x_start:x_end]
# 检查图像是否有效
if char_img.size == 0:
print(f"跳过空图像区域: {i}")
continue# 标记区域类型
is_manual = any(
abs(x - mx) < 5 and abs(y - my) < 5 and abs(w - mw) < 5 and abs(h - mh) < 5
for mx, my, mw, mh in manual_regions
)
region_type = "manual" if is_manual else "auto"
output_path = os.path.join(output_dir, f"char_{i:03d}_{region_type}.png")
cv2.imwrite(output_path, char_img)
char_images.append(output_path)print(f"保存字符 {i:03d} ({region_type}): 位置({x}, {y}), 尺寸({w}x{h})")
# 创建可视化结果
self.create_visualization(original_img, regions, adjusted_regions, manual_regions, removed_regions, output_dir, show_windows)print(f"处理完成!共分割出 {len(char_images)} 个字符")
return char_imagesdef create_visualization(self, original_img, all_regions, main_regions, manual_regions, removed_regions, output_dir, show_windows=False):
"""创建可视化结果"""
result_img = original_img.copy()# 绘制所有检测到的区域(半透明红色)
for x, y, w, h in all_regions:
overlay = result_img.copy()
cv2.rectangle(overlay, (x, y), (x + w, y + h), (0, 0, 255), -1)
cv2.addWeighted(overlay, 0.3, result_img, 0.7, 0, result_img)
cv2.rectangle(result_img, (x, y), (x + w, y + h), (0, 0, 255), 1)# 绘制最终区域
auto_count = 0
manual_count = 0
removed_count = len(removed_regions)for x, y, w, h in main_regions:
is_manual = any(
abs(x - mx) < 5 and abs(y - my) < 5 and abs(w - mw) < 5 and abs(h - mh) < 5
for mx, my, mw, mh in manual_regions
)
if is_manual:
cv2.rectangle(result_img, (x, y), (x + w, y + h), (0, 255, 255), 3) # 黄色:手动添加
manual_count += 1
else:
cv2.rectangle(result_img, (x, y), (x + w, y + h), (0, 255, 0), 2) # 绿色:自动检测
auto_count += 1# 绘制被删除的区域(红色边框)
for x, y, w, h in removed_regions:
cv2.rectangle(result_img, (x, y), (x + w, y + h), (0, 0, 255), 2)# 添加图例
legend_y = 30
cv2.putText(result_img, "Red: Removed Regions", (10, legend_y), cv2.FONT_HERSHEY_SIMPLEX, 0.6, (0, 0, 255), 2)
cv2.putText(result_img, "Green: Auto-detected", (10, legend_y + 30), cv2.FONT_HERSHEY_SIMPLEX, 0.6, (0, 255, 0), 2)
cv2.putText(result_img, "Yellow: Manual Regions", (10, legend_y + 60), cv2.FONT_HERSHEY_SIMPLEX, 0.6, (0, 255, 255), 2)
cv2.putText(result_img, f"Auto: {auto_count}, Manual: {manual_count}, Removed: {removed_count}",
(10, legend_y + 90), cv2.FONT_HERSHEY_SIMPLEX, 0.6, (255, 255, 255), 2)vis_path = os.path.join(output_dir, "segmentation_result.jpg")
cv2.imwrite(vis_path, result_img)
print(f"可视化结果已保存: {vis_path}")if show_windows:
height, width = result_img.shape[:2]
if width > 1200:
scale = 1200 / width
display_img = cv2.resize(result_img, (int(width * scale), int(height * scale)))
else:
display_img = result_imgcv2.imshow('Segmentation Result', display_img)
print("按任意键关闭窗口...")
cv2.waitKey(0)
cv2.destroyAllWindows()# 其余函数保持不变(interactive_adjustment, batch_process_images, single_image_process, main)
def interactive_adjustment():
"""交互式参数调整"""
print("=== 古籍文字分割参数调整 ===")min_char_width = int(input("最小字符宽度 (默认20): ") or 20)
max_char_width = int(input("最大字符宽度 (默认150): ") or 150)
min_char_height = int(input("最小字符高度 (默认25): ") or 25)
max_char_height = int(input("最大字符高度 (默认150): ") or 150)
width_expansion = float(input("宽度扩展比例 (默认0.05): ") or 0.05)
height_expansion = float(input("高度扩展比例 (默认0.1): ") or 0.1)
min_aspect_ratio = float(input("最小宽高比 (默认0.2): ") or 0.2)
max_aspect_ratio = float(input("最大宽高比 (默认4.0): ") or 4.0)return AncientTextSegmentor(
min_char_width=min_char_width,
max_char_width=max_char_width,
min_char_height=min_char_height,
max_char_height=max_char_height,
width_expansion=width_expansion,
height_expansion=height_expansion,
min_aspect_ratio=min_aspect_ratio,
max_aspect_ratio=max_aspect_ratio
)def batch_process_images():
"""批量处理文件夹中的所有图像"""
print("=== 批量处理模式 ===")input_folder = input("请输入包含古籍图像的文件夹路径: ").strip().strip('"')
if not input_folder or not os.path.exists(input_folder):
print("文件夹不存在")
returnimage_extensions = ['*.jpg', '*.jpeg', '*.png', '*.bmp', '*.tiff', '*.tif']
image_files = []for extension in image_extensions:
image_files.extend(glob.glob(os.path.join(input_folder, extension)))
image_files.extend(glob.glob(os.path.join(input_folder, extension.upper())))if not image_files:
print("在指定文件夹中未找到图像文件")
returnprint(f"找到 {len(image_files)} 个图像文件")
print("\n选择参数模式:")
print("1. 自动模式 (使用优化参数)")
print("2. 手动调整参数")
mode = input("请选择 (1/2): ").strip()if mode == "2":
segmentor = interactive_adjustment()
else:
segmentor = AncientTextSegmentor(
min_char_width=15,
max_char_width=180,
min_char_height=20,
max_char_height=180,
width_expansion=0,
height_expansion=0,
min_aspect_ratio=0.1,
max_aspect_ratio=5.0
)show_windows = input("处理时是否显示可视化窗口?(y/N): ").strip().lower() == 'y'
enable_manual = input("是否启用手动补框选?(y/N): ").strip().lower() == 'y'main_output_dir = os.path.join(input_folder, "batch_output")
os.makedirs(main_output_dir, exist_ok=True)total_images = len(image_files)
processed_count = 0
success_count = 0print(f"\n开始批量处理 {total_images} 个图像...")
for i, image_path in enumerate(image_files):
print(f"\n{'='*50}")
print(f"处理图像 {i+1}/{total_images}: {os.path.basename(image_path)}")
print(f"{'='*50}")try:
image_name = os.path.splitext(os.path.basename(image_path))[0]
output_dir = os.path.join(main_output_dir, image_name)char_images = segmentor.segment_characters(image_path, output_dir, show_windows=show_windows, enable_manual=enable_manual)
if char_images:
success_count += 1
print(f"✅ 成功处理: {os.path.basename(image_path)} - 分割出 {len(char_images)} 个字符")
else:
print(f"⚠️ 警告: {os.path.basename(image_path)} - 未分割出字符")except Exception as e:
print(f"❌ 处理失败: {os.path.basename(image_path)} - 错误: {e}")processed_count += 1
print(f"\n{'='*60}")
print("批量处理完成!")
print(f"{'='*60}")
print(f"总图像数: {total_images}")
print(f"成功处理: {success_count}")
print(f"失败数量: {processed_count - success_count}")
print(f"输出目录: {main_output_dir}")
print(f"{'='*60}")def single_image_process():
"""单张图像处理模式"""
print("=== 单张图像处理模式 ===")input_image = input("请输入古籍图像路径: ").strip().strip('"')
if not input_image or not os.path.exists(input_image):
print("文件不存在")
returnprint("\n选择模式:")
print("1. 自动模式 (使用优化参数)")
print("2. 手动调整参数")
mode = input("请选择 (1/2): ").strip()if mode == "2":
segmentor = interactive_adjustment()
else:
segmentor = AncientTextSegmentor(
min_char_width=15,
max_char_width=180,
min_char_height=20,
max_char_height=180,
width_expansion=0,
height_expansion=0,
min_aspect_ratio=0.1,
max_aspect_ratio=5.0
)print(f"处理图像: {input_image}")
output_dir = "./output_chars"
char_images = segmentor.segment_characters(input_image, output_dir, show_windows=True, enable_manual=True)if char_images:
print(f"\n✅ 处理完成!字符图片保存在: {output_dir}")
print(f"共生成 {len(char_images)} 个字符图片")
else:
print("\n❌ 处理失败")def main():
"""主函数"""
print("=== 古籍文字分割工具 (增强版:手动补框选 + 删除错误区域) ===")while True:
print("\n选择处理模式:")
print("1. 单张图像处理")
print("2. 批量处理文件夹")
print("3. 退出")choice = input("请选择 (1/2/3): ").strip()
if choice == "1":
single_image_process()
elif choice == "2":
batch_process_images()
elif choice == "3":
print("再见!")
break
else:
print("无效选择,
阿东游客@赤霄 #197219
我安装了,python,运行时提醒缺opencv,按deepseek装也不得,也不知道怎么回事。
赤霄游客@阿东 #197227
你让deepseek发国内安装镜像,opencv(切图)、paddle(识别)、potrace(转图),繁体识别可能还会用到opencc
典中典游客PermissionError: [Errno 13] Permission denied 没有访问权限,第一步就卡死了
赤霄游客@典中典 #197242
重新正确安装python
赤霄游客@雲灬甫 #197247
精品
独自成俑游客paddle的识别率不假,可以考虑看典古籍的接口,对手写刻本识别率极高,免费的,有api
赤霄游客@独自成俑 #197256
感谢推荐,我也发现umi的rapid版本比paddle版本正确率高,阅读paddle文档感觉是要用显卡的版本才行。
赤霄游客看典古籍api要申请才能用,找到个开源的cnocr,后面空了就试试效果,不行就还是用opencv切图+umi识别人工校核。
cnocr提取文字区域存图代码,感兴趣的可以先试试。
from cnocr import CnOcr
import cv2
import numpy as np
import json
import os
from typing import List, Dict, Tuple
import matplotlib.pyplot as plt
from PIL import Imageclass AncientBooksOCR:
def __init__(self, model_name: str = 'densenet_lite_136-gru'):
"""
初始化古籍OCRArgs:
model_name: 模型名称
- 'densenet_lite_136-gru': 轻量模型,平衡精度和速度
- 'densenet_lite_136-fc': 更轻量,速度更快
- 'densenet_lite_136-gru_no_rnn': 无RNN,适合简单场景
"""
self.ocr = CnOcr(
model_name=model_name,
cand_alphabet='0123456789abcdefghijklmnopqrstuvwxyzABCDEFGHIJKLMNOPQRSTUVWXYZ()[]()[],。;:?!「」『』《》〈〉【】〖〗〝〞""\'\'·―—~~.,;:?!'
)
print(f"CnOCR模型加载完成: {model_name}")def detect_text_regions(self, image_path: str, **kwargs) -> List[Dict]:
"""
检测图像中的文字区域Args:
image_path: 图像路径
**kwargs: 额外参数Returns:
文字区域列表
"""
# 读取图像
if isinstance(image_path, str):
img = self._read_image(image_path)
else:
img = image_path# 进行OCR识别
result = self.ocr.ocr(img, **kwargs)# 格式化结果
formatted_results = []
for i, item in enumerate(result):
formatted_results.append({
'id': i + 1,
'text': item['text'],
'score': float(item['score']),
'position': item['position'].tolist() if hasattr(item['position'], 'tolist') else item['position'],
'bbox': self._get_bounding_box(item['position'])
})return formatted_results
def detect_vertical_text(self, image_path: str) -> List[Dict]:
"""
专门处理竖排文字Args:
image_path: 图像路径Returns:
竖排文字识别结果
"""
# 预处理图像,增强竖排文字识别
img = self._read_image(image_path)
processed_img = self._preprocess_for_vertical_text(img)# 使用更适合竖排文字的参数
result = self.ocr.ocr(
processed_img,
rec_batch_size=64, # 减小batch size以适应竖排文字
det_model_name='ch_PP-OCRv3_det' # 使用更好的检测模型
)return self._format_results(result)
def batch_process(self, image_folder: str, output_dir: str = 'results') -> Dict:
"""
批量处理文件夹中的图像Args:
image_folder: 图像文件夹路径
output_dir: 输出目录Returns:
批量处理结果
"""
if not os.path.exists(output_dir):
os.makedirs(output_dir)image_files = [f for f in os.listdir(image_folder)
if f.lower().endswith(('.png', '.jpg', '.jpeg', '.bmp', '.tiff'))]results = {}
for image_file in image_files:
image_path = os.path.join(image_folder, image_file)
try:
print(f"处理图像: {image_file}")
result = self.detect_text_regions(image_path)# 保存单个结果
base_name = os.path.splitext(image_file)[0]
output_path = os.path.join(output_dir, f"{base_name}_result.json")
self._save_json(result, output_path)# 生成可视化图像
viz_path = os.path.join(output_dir, f"{base_name}_visualization.jpg")
self.visualize_results(image_path, result, viz_path)results[image_file] = {
'result': result,
'output_path': output_path,
'viz_path': viz_path
}except Exception as e:
print(f"处理图像 {image_file} 时出错: {e}")
results[image_file] = {'error': str(e)}return results
def visualize_results(self, image_path: str, results: List[Dict], output_path: str = None):
"""
可视化识别结果Args:
image_path: 原始图像路径
results: 识别结果
output_path: 输出图像路径
"""
# 读取图像
img = cv2.imread(image_path)
if img is None:
print(f"无法读取图像: {image_path}")
return# 绘制边界框和文字
for i, item in enumerate(results):
bbox = item['bbox']
text = item['text']
score = item['score']# 绘制边界框
pts = np.array(bbox, np.int32).reshape((-1, 1, 2))
cv2.polylines(img, [pts], True, (0, 255, 0), 2)# 添加文字
x, y = bbox[0]
cv2.putText(img, f'{i+1}:{text[:10]}...', (x, y-10),
cv2.FONT_HERSHEY_SIMPLEX, 0.6, (0, 255, 0), 2)# 添加置信度
cv2.putText(img, f'{score:.2f}', (x, y-30),
cv2.FONT_HERSHEY_SIMPLEX, 0.5, (255, 0, 0), 1)if output_path:
cv2.imwrite(output_path, img)
print(f"可视化结果已保存: {output_path}")
else:
cv2.imshow('OCR Results', img)
cv2.waitKey(0)
cv2.destroyAllWindows()def _read_image(self, image_path: str) -> np.ndarray:
"""读取图像"""
img = cv2.imread(image_path)
if img is None:
raise ValueError(f"无法读取图像: {image_path}")
return cv2.cvtColor(img, cv2.COLOR_BGR2RGB)def _preprocess_for_vertical_text(self, img: np.ndarray) -> np.ndarray:
"""
为竖排文字预处理图像
"""
# 转换为灰度图
if len(img.shape) == 3:
gray = cv2.cvtColor(img, cv2.COLOR_RGB2GRAY)
else:
gray = img# 对比度增强
clahe = cv2.createCLAHE(clipLimit=2.0, tileGridSize=(8, 8))
enhanced = clahe.apply(gray)# 二值化
_, binary = cv2.threshold(enhanced, 0, 255, cv2.THRESH_BINARY + cv2.THRESH_OTSU)return binary
def _get_bounding_box(self, position: np.ndarray) -> List[List[int]]:
"""从位置信息获取边界框"""
if hasattr(position, 'tolist'):
position = position.tolist()
return positiondef _format_results(self, result: List) -> List[Dict]:
"""格式化结果"""
formatted = []
for i, item in enumerate(result):
formatted.append({
'id': i + 1,
'text': item['text'],
'score': float(item['score']),
'position': item['position'].tolist() if hasattr(item['position'], 'tolist') else item['position'],
'bbox': self._get_bounding_box(item['position'])
})
return formatteddef _save_json(self, data: Dict, file_path: str):
"""保存JSON数据"""
with open(file_path, 'w', encoding='utf-8') as f:
json.dump(data, f, ensure_ascii=False, indent=2)def main():
"""使用示例"""
# 初始化OCR
ocr = AncientBooksOCR()# 单张图像处理
print("=== 单张图像处理 ===")
image_path = "ancient_book.jpg" # 替换为您的图像路径try:
# 基础识别
results = ocr.detect_text_regions(image_path)
print(f"识别到 {len(results)} 个文字区域")# 打印识别结果
for i, result in enumerate(results):
print(f"{i+1}. 文字: {result['text']}, 置信度: {result['score']:.3f}")# 可视化结果
ocr.visualize_results(image_path, results, "ocr_result.jpg")# 保存结果到JSON
with open('ocr_results.json', 'w', encoding='utf-8') as f:
json.dump(results, f, ensure_ascii=False, indent=2)
print("结果已保存到 ocr_results.json")except Exception as e:
print(f"处理失败: {e}")# 批量处理示例
print("\n=== 批量处理 ===")
image_folder = "ancient_books" # 替换为您的图像文件夹
if os.path.exists(image_folder):
batch_results = ocr.batch_process(image_folder)
print(f"批量处理完成,共处理 {len(batch_results)} 张图像")
else:
print(f"图像文件夹 {image_folder} 不存在,跳过批量处理")if __name__ == "__main__":
main()
赤霄游客哈哈,cnocr也是基于paddle的,等用了看效果。
赤霄游客提供另外一种切分图片的思路,这个也是我一开始准备采用的,调用Segment Anything,不用依赖文字检测,直接分块。
代码如下:
import os
from pathlib import Pathclass BatchAncientBookProcessor:
def __init__(self, segmenter, output_dir="output_masks"):
self.segmenter = segmenter
self.output_dir = Path(output_dir)
self.output_dir.mkdir(exist_ok=True)def process_directory(self, input_dir):
"""处理目录中的所有古籍图像"""
input_path = Path(input_dir)
image_files = list(input_path.glob("*.jpg")) + list(input_path.glob("*.png"))results = {}
for image_file in image_files:
print(f"处理: {image_file.name}")try:
# 使用自动分割
masks, scores, image, boxes = self.segmenter.segment_entire_page(str(image_file))# 保存结果
result = {
'masks': masks,
'scores': scores,
'boxes': boxes,
'image_shape': image.shape
}# 保存掩码
self.save_masks(masks, image_file.stem)results[image_file.name] = result
except Exception as e:
print(f"处理 {image_file.name} 时出错: {e}")return results
def save_masks(self, masks, base_name):
"""保存分割掩码"""
for i, mask in enumerate(masks):
mask_filename = self.output_dir / f"{base_name}_mask_{i:03d}.png"
cv2.imwrite(str(mask_filename), mask.astype(np.uint8) * 255)# 批量处理示例
def batch_processing_example():
# 初始化分割器
sam = sam_model_registry["vit_h"](checkpoint="sam_vit_h_4b8939.pth")
predictor = SamPredictor(sam)
auto_segmenter = AutoAncientBookSegmenter(predictor)# 创建批量处理器
batch_processor = BatchAncientBookProcessor(auto_segmenter)# 处理整个目录
results = batch_processor.process_directory("ancient_books/")- 作者帖子
 测试效果图
测试效果图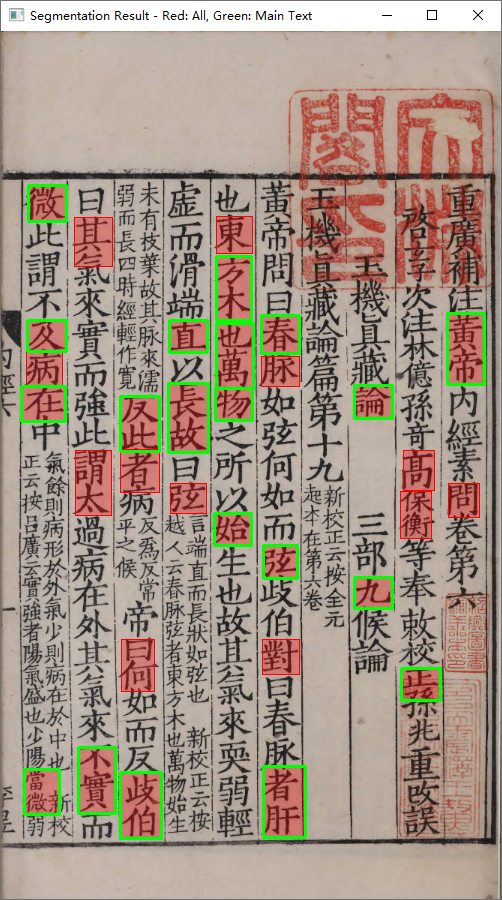


 代码
代码

图书馆推荐
近期回复
-
 许由 在 【双层PDF版】国家珍贵古籍选录(中华古籍智慧化服务平台)
 - xiaopengyou 在 寻求《图书编》明万历四十一年(1613)新建万尚烈刻本(祖本)
- 棕桉 在 而立之年,感慨系深。幸遇书格,重拾旧好。余生随缘,自在逍遥。(分享书籍)
- 双溪钓叟 在 求韩国中央图书馆胶卷《五倫全备记》
- sant3 在 后汉书注
- sant3 在 后汉书注
- twilightlin 在 后汉书注
- 书格AI 在 20多万个夸克分享链接 古籍 guji.cc
博物馆推荐
公众号:书格

关注了解最新动态
每个人都能自由地看到我们的文明
书格致力于开放式分享、介绍公共版权领域的数字资源
CC BY 4.0:知识共享 署名 4.0 国际